Crochet Fish Bag Pattern

Add a little personality to your wardrobe with this whimsical crochet fish bag!

Whether you’re looking for a unique summer crochet project, a beach bag with a little personality, or a fun handmade gift, this fish purse is an enjoyable project that’s sure to get compliments.

The pattern uses basic crochet stitches and a few simple finishing techniques. The written pattern includes step-by-step instructions for crocheting and assembling the fish bag, and a video tutorial is available if you prefer to crochet along with me.
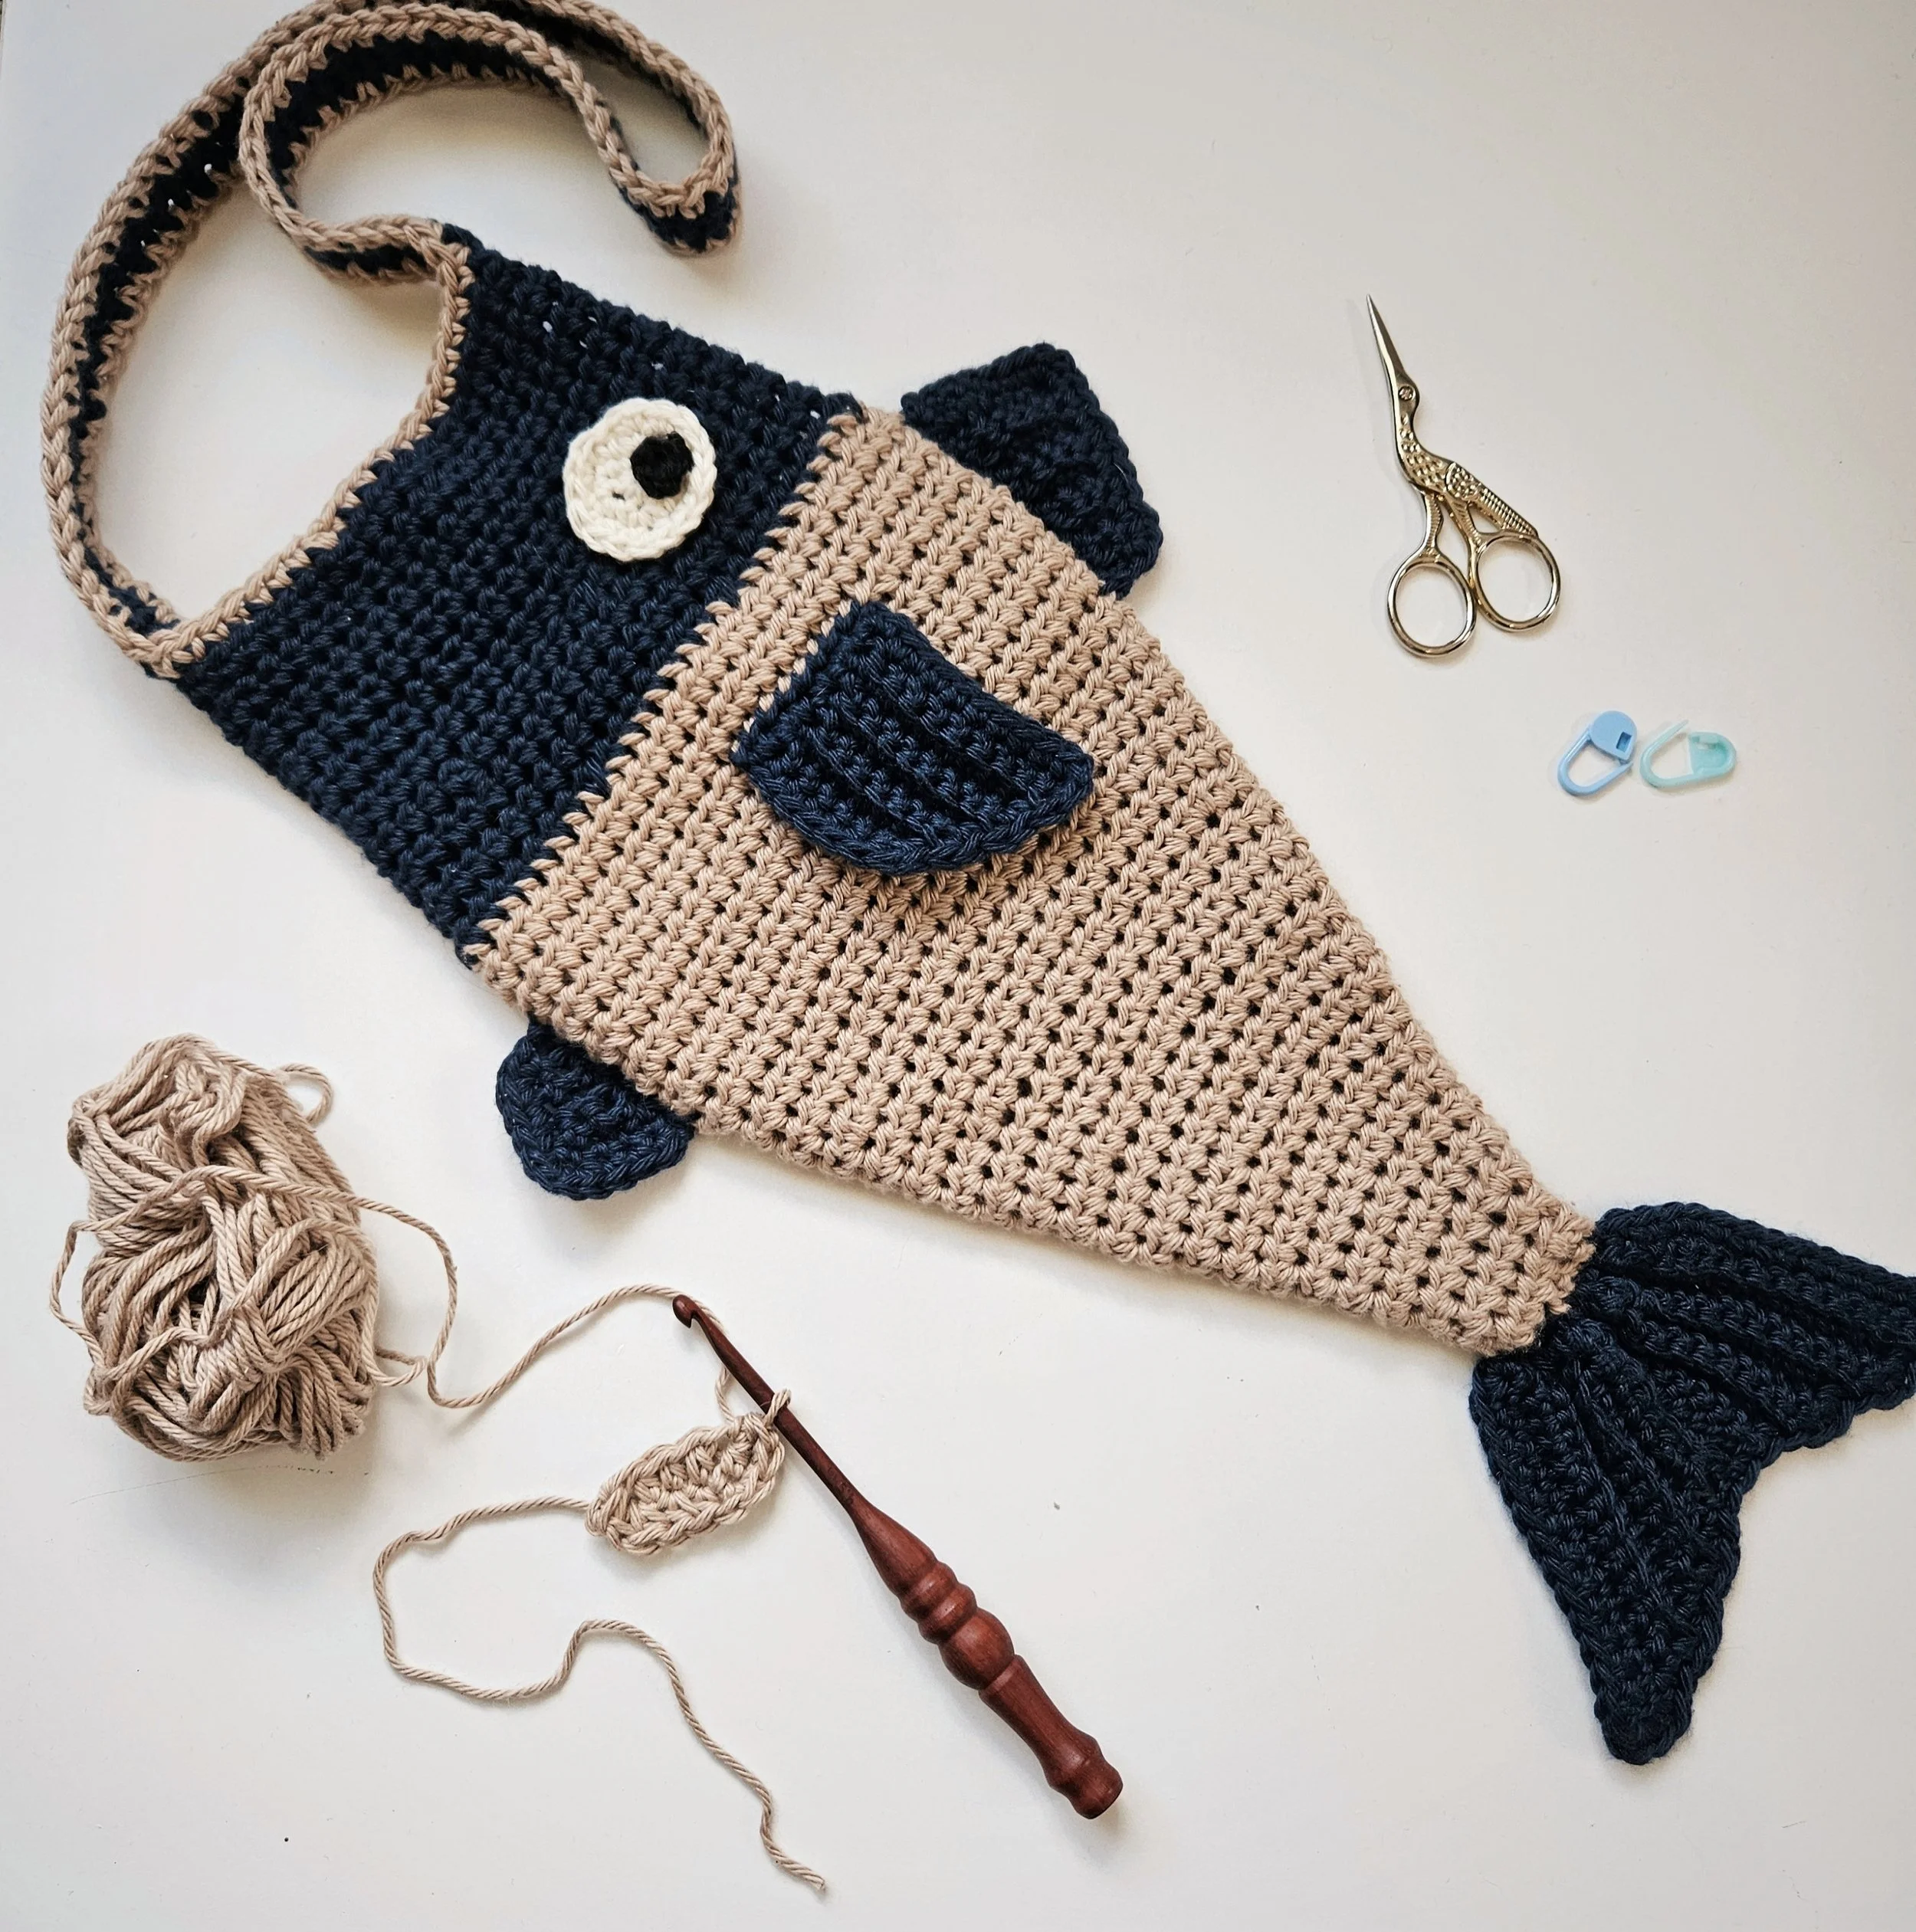
how to crochet a fish bag

Want the printable, ad-free PDF?

Get the complete pattern in an easy-to-print format and crochet without the ads.

Also available on Etsy and Ravelry.

Fish Bag Video Tutorial

Prefer to crochet along with me? I've made a step-by-step video tutorial showing you how to crochet and assemble the fish bag. You can watch it below and follow along with the written pattern as you go.

Difficulty

This pattern is rated EASY. Simple stitches are used and a video tutorial is provided.

Hook Size & Notions

Yarn

Yarn Requirements

85 g (180 m / 195 y) total of a worsted weight (4) yarn in your choice of colors.

(You will need a small amount of both black and white yarn for the eye).

Yarn Details

Sample was made withKnit Picks Comfy Worsted Weight: 75% Pima Cotton 25% Acrylic, worsted weight (4); 100 m (109 yd) per 50 g (1.8 oz).

Knit Picks Comfy Worsted is a cotton/acrylic blend yarn that creates a sturdy fabric while still giving the bag enough drape to be comfortable to carry. Because bags receive more wear than many decorative crochet projects, I recommend choosing a yarn with good durability, like a cotton or linen blend.

For the best results, choose a yarn that matches the pattern's weight and gauge.

Yarn Substitutions

If you don't have the recommended yarn, you can substitute another yarn as long as you can match the required gauge.

A similar worsted weight cotton yarn would be a good place to start. Cotton is especially well suited to crochet bags because it produces a sturdy fabric and holds its shape well. Here are some of my favorites:

  1. Lily Sugar’n Cream Yarn

  2. Lion Brand 24/7 Cotton

Keep in mind that changing yarn may affect the finished size, texture, and amount of yarn required.

Finished Measurements

The bag measures 42 cm (16.5") from mouth to the tip of the tail.

The bag is 18 cm (7") at its widest point.

The bag strap is a cutomizable length.

Gauge

14 half double crochet stitches and 10 half double crochet rows in 10 cm (4").

If you're not sure what gauge is or how to check yours, don't worry! I have a whole guide that walks you through what crochet gauge is, how to make a gauge swatch, and how to adjust your project if your gauge doesn't match the pattern.

How to Check Crochet Gauge

If you're newer to crochet and gauge still feels like a foreign language, you might also enjoy my 10-Week Learn to Crochet Course. It's designed to take you from the very beginning to confidently reading crochet patterns, but it's also useful if you've been crocheting for a while and want to fill in some of the gaps.

We cover the fundamentals that are easy to miss when you learn on your own, including yarn weights, choosing and substituting yarn, crochet gauge, reading patterns, and the basic stitches you'll use again and again.

Learn to Crochet in 10 Weeks

Abbreviations

These are all US abbreviations from Craft Yarn Council standards.

BLO - back loop only

ch(s) - chain(s)

hdc - half double crochet

rep - repeat

rnd - round

sc - single crochet

sk - skip

sl st - slip stitch

st(s) - stitch(s)

yo - yarn over

( ) - work instructions within parentheses as many times as directed or work a group of stitches all in the same stitch or space

** - repeat instructions between asterisks as many times as directed

Special Stitches & Techniques

Invisible Join

An invisible join creates a neat, nearly seamless finish when joining your work at the end of a round.

To make an invisible join, fasten off, pull the yarn tail through the stitch and thread it onto a tapestry needle. Insert the needle under both loops of the second stitch of the round, from front to back, then insert it into the back loop only in the stitch the yarn tail is coming from, from front to back.

Weave in the remaining end securely.

How to make an invisible join

Magic Circle

A magic circle, also called a magic ring, is an adjustable loop used to begin crocheting in the round. It allows you to close the center of your work tightly so there isn't a large hole in the middle.

If you're new to the magic circle, don't worry, it's a technique that becomes much easier with practice. I have a tutorial here:

How to make a magic circle

Half Double Crochet 2 Together (hdc 2 together)

  1. Yarn over.

  2. Insert your hook into the first stitch.

  3. Yarn over and pull up a loop (3 loops on hook).

  4. Yarn over.

  5. Insert your hook into the next stitch.

  6. Yarn over and pull up a loop (5 loops on hook).

  7. Yarn over and pull through all 5 loops on your hook.

Notes

  • The market bag is worked bottom up. The fin, eyes, and strap are worked separately and then attached to the bag.

  • The right side of the bag is the side facing away from you while you crochet.

  • This bag is worked in un-joined rounds, mark the first stitch of each round with a stitch marker.

Unlock Your Free Pattern with Grow.me!

Want to access this free crochet pattern? Simply sign up for a Grow.me account with your email address!

By signing up, you’ll get access to this pattern and future free ones, plus updates on new designs and crochet tips. It’s a great way to stay in the loop and support my work, all while enjoying awesome crochet patterns! It's super quick and easy, just follow these steps:

  • Enter Your Email
    Type in your email and click “Unlock Pattern.” That’s it!

  • Check Your Inbox
    You might get a quick confirmation email—just click the link to finalize your account.

  • Start Crocheting
    Once you’re signed up, you can view the pattern and start crafting right away!

Please note: Grow.me manages all account-related issues, including password resets. I do not have access to help with lost passwords, so please make sure you keep your account information safe!

Fish Bag Pattern

Body

With a 5 mm crochet hook, Ch 7

Rnd 1 Hdc in the back hump of the 3rd ch from hook, hdc in the back hump of each of the next 3 chs, 3 hdc in the final ch.

Rotate your work to continue along the opposite side of the foundation chain. Hdc in each of the next 3 chs, then 2 hdc in the final ch (the same ch where you worked the first hdc; this ch will now have 3 hdc total) {12 sts}

Rnds 2 - 3 hdc in each st around {12 sts}

Rnd 4 *hdc in next st, hdc 2 times in next st* rep around {18 sts}

Rnds 5 - 6 hdc in each st around {18 sts}

Rnd 7 *hdc in next 2 sts, hdc 2 times in next st* rep around {24 sts}

Rnds 8 - 9 hdc in each st around {24 sts}

Rnd 10 *hdc in next 3 sts, hdc 2 times in next st* rep around {30 sts}

Rnds 11 - 12 hdc in each st around {30 sts}

Rnd 13 *hdc in next 4 sts, hdc 2 times in next st* rep around {36 sts}

Rnds 14 - 15 hdc in each st around {36 sts}

Rnd 16 *hdc in next 5 sts, hdc 2 times in next st* rep around {42 sts}

Rnds 17 - 18 hdc in each st around {42 sts}

Rnd 19 *hdc in next 6 sts, hdc 2 times in next st* rep around {48 sts}

Rnds 20 - 21 hdc in each st around {48 sts}

Rnd 22 *hdc in next 7 sts, hdc 2 times in next st* rep around {54 sts}

Rnds 23 - 28 hdc in each st around (54 sts}

For color changes, Rnds 29–38 form the head of the fish.

Rnd 29 *hdc 2 together, hdc in next 7 sts* rep around {48 sts}

Rnds 30 - 31 hdc in each st around {48 sts}

Rnd 32 *hdc 2 together, hdc in next 6 sts* rep around {42 sts}

Rnds 33 - 38 hdc in each st around {42 sts}

Strap

Lay the bag flat with the bottom seam aligned.

The strap is 3 sts wide on each side, with 18 sts between the strap sections.

Place a stitch marker on each side of the 3 stitch section to mark the beginning and end of each strap.

Using a 5 mm crochet hook, join yarn for the strap at the rightmost stitch marker on either side of the bag.

Row 1 ch 1, sc to next stitch marker, sc in st containing stitch marker, ch 1, turn {3 sts}

Rows 2 - 76 (or as many of as few rows as you prefer) sc in each st, ch 1, turn (on the last row don’t ch 1, turn) {3 sts}

Fasten off, leaving a long tail for seaming.

Thread the yarn tail with a tapestry needle, whip stitch the end of the strap to the 3 stitches marked by the stitch markers on the opposite side of the bag.

Using a 5 mm crochet hook, join a new yarn in any stitch along the top of the fish’s “mouth.”

Ch 1, single crochet in each stitch across the mouth and work 1 single crochet into the side of each row along the strap of the bag.

When you reach the beginning of the round, slip stitch to the first stitch and fasten off using an invisible join.

Repeat on the opposite side of the strap and fish’s “mouth.”

Tail Fin (make 2)

Using a 5 mm crochet hook, Ch 15

Row 1 sc in back hump of second ch from hook, sc in each ch across, ch 1, turn {14 sts}

Row 2 sc in first st, BLO sc in next 11 sts, ch 1, turn {12 sts}

Row 3 BLO sc in each st across, sc in last st, ch 1, turn {12 sts}

Row 4 sc in first st, BLO sc in next 9 sts, ch 1, turn {10 sts}

Row 5 BLO sc in each st across, sc in last st, ch 1, turn {10 sts}

Row 6 sc in first st, BLO in next 7 sts, ch 1, turn {8 sts}

Row 7 BLO sc in each st across, sc in last st {8 sts}

Fasten off leaving a long tail for seaming.

Using a tapestry needle, whip stitch both tail fins together on their short sides.

Border

Using a 5 mm crochet hook, join same color yarn as the tail fins to the top right corner of the seamed fin.

Top and left side:

sc evenly into the side of each row across the top of the fin, sc 3 times into the last row, then sc in each stitch along the left side of the fin.

Left-side notches:

sc 3 times into the end of the first row at the bottom of the fin.

sc in each of the 2 skipped stitches.

sc in the end of the next row.

sc in each of the next 2 skipped stitches.

sc in the end of the next row.

sc in each of the next 2 skipped stitches.

Bottom of fin:

sc in the side of each row across the bottom edge of the fin.

Right-side notches:

sc in each of the next 2 skipped stitches.

sc in the end of the next row.

sc in each of the next 2 skipped stitches.

sc in the end of the next row.

sc in each of the next 2 skipped stitches.

sc 3 times in the end of the next row.

Right side:

sc in each st along the right side of the fin.

sl st to the first sc to join.

Fasten off, leaving a long tail for seaming.

Attach the Tail Fin

Thread the long tail onto a tapestry needle.

Weave the needle in and out through the sc stitches along the top edge of the tail fin.

Pull the yarn gently to gather the top edge until it is approximately the same length as the bottom of the fish bag.

Position the tail fin along the bottom of the fish bag and whip stitch the gathered edge of the tail fin to the bottom of the bag, working through both layers. Secure the yarn and weave in the remaining end.

Pectoral Fins (make 2)

Using a 5 mm crochet hook, Ch 11

Row 1 sc in back hump of second ch from hook, sc in each ch across, ch 1, turn {10 sts}

Row 2 sc in first st, BLO sc in next 8 sts, ch 1, turn {9 sts}

Row 3 BLO sc in each st across, sc in last st, ch 1, turn {9 sts}

Row 4 sc in first st, BLO sc in next 7 sts, ch 1, turn {8 sts}

Row 5 BLO sc in each st across, sc in last st, ch 1, turn {8 sts}

Row 6 sc in first st, BLO sc in next 6 sts, ch 1, turn {7 sts}

Row 7 BLO sc in each st across, sc in last st, ch 1, turn {7 sts}

Border

Side of Row 7 and Bottom Notches:

sc in each st down the side of Row 7.

sc in the end of Row 7.

sc in the skipped st.

sc in the end of the next row.

sc in the skipped st.

sc in the end of the next row.

sc in the skipped st.

Side of Row 1 and Top:

sc 3 times in the end of Row 1.

sc in each st up the side of Row 1.

sc 3 times in the last st of Row 1.

sc in the end of each row across the top of the fin.

sl st to the first sc of the rnd.

Fasten off, leaving a long tail for seaming the fin to the body of the bag.

Whip stitch one pectoral fin to each side of the bag, positioning them just below the fish’s “face” and centered on each side of the bag.

Make sure the long edge of each fin is aligned in the same direction on both sides of the bag before sewing in place.

Dorsal Fin

Using a 5 mm crochet hook, Ch 7

Row 1 sc in back hump of second ch from hook, sc in each ch across, ch 1, turn {6 sts}

Row 2 sc in first st, BLO sc in next 4 sts, ch 1, turn {5 sts}

Row 3 BLO sc in each st across, sc in last st, ch 1, turn {5 sts}

Row 4 sc in first st, BLO sc in next 3 sts, ch 1, turn {4 sts}

Row 5 BLO sc in each st across, sc in last st, ch 1, turn {4 sts}

Row 6 sc in first st, BLO sc in next 2 sts, ch 1, turn {3 sts}

Row 7 BLO sc in each st across, sc in last st, ch 1, turn {3 sts}

Row 8 sc in first st, BLO sc in next st, ch 1, turn {2 sts}

Row 9 BLO sc in first st, sc 3 times in last st {4 sts}

Border

sc in the end of each row across the bottom of the fin.

sc 3 times in the first st of Row 1.

sc in each st across Row 1.

sc in the end of Row 1.

sc in the skipped st.

sc in the end of the next row.

sc in the skipped st.

sc in the end of the next row.

sc in the skipped st.

sc in the end of the next row.

sc in the skipped st.

sc in the end of the next row.

sc in the next st (the first st of Row 7).

sl st to the first sc of the rnd.

Fasten off leaving a long tail for seaming.

Whip stitch the dorsal fin to the top of the bag, positioning it just below the fish’s “face” and aligned to the top of the bag when it is laid flat with the bottom seam aligned.

Bottom Fin

Using a 5 mm crochet hook, Ch 5

Row 1 sc in back hump of second ch from hook, sc in each ch across, ch 1, turn {4 sts}

Row 2 sc in first st, BLO sc in next 2 sts, ch 1, turn {3 sts}

Row 3 BLO sc in each st across, sc in last st, ch 1, turn {3 sts}

Row 4 sc in first st, BLO sc in next st, ch 1, turn {2 sts}

Row 5 BLO sc in next, sc 3 times in last st {2 sts}

Border

sc in the end of each row across the bottom of the fin.

sc 3 times in the first st of Row 1.

sc in each st across Row 1.

sc in the end of Row 1.

sc in the skipped st.

sc in the end of the next row.

sc in the skipped st.

sc in the end of the next row.

sc in the next st (the first st of Row 5).

sl st to the first sc of the rnd.

Fasten off leaving a long tail for seaming.

Whip stitch the bottom fin to the bottom of the bag, positioning it just below the dorsal fins. When the bag is laid flat with the bottom seam aligned, the fin should be centered along the bottom edge of the bag.

Eyes (make 2)

Using a 5 mm crochet hook and white yarn, make a magic loop

Rnd 1 ch 1, sc 6 times in magic loop, pull to close magic loop {6 sts}

Rnd 2 sc 6 times in each st around {12 sts}

Rnd 3 *sc in next st, sc 2 times in next st* rep around {18 sts}

Fasten off using an invisible join, leaving a long tail for seaming.

Using a 5 mm crochet hook and black yarn, make a magic loop

Rnd 1 ch 1, sc 6 times in magic loop, pull to close magic loop {6 sts}

Fasten off using an invisible join, leaving a long tail for seaming.

Using the long tail of the black eye piece, whip stitch it to the white eye piece near the edge of the white, rather than in the center. (Of course, you can position it in the center if that’s the look you prefer).

Use the long tail from the white eye piece to whip stitch the eye onto the fish’s “face”, positioning it near the edge of the face.

Repeat for the second eye on the opposite side of the bag.

More Crochet Inspiration

If you enjoyed making this crochet fish bag, here are a few more crochet projects you might enjoy:

Shaggy Dog Tissue Box Cover

Add some personality to your home with this adorable crochet tissue box cover. The shaggy texture gives this little dog plenty of character and makes an ordinary tissue box a whole lot more fun.

Shaggy Dog Tissue Box Cover

Crochet Flower Purse

Looking for another playful crochet accessory? This crochet flower purse is a fun little project that's perfect for adding a handmade touch to an outfit.

Crochet Flower Purse

Crochet Bunny Mittens

Keep little hands cozy with these sweet crochet bunny mittens. They're a fun wearable project and make an especially cute handmade gift for kids.

Crochet Bunny Mittens

Want more crochet projects like these? Browse all Stitch & Hound crochet patterns →

Learn to Crochet

New to crochet or want to build your skills before tackling your next project?

I created my Learn to Crochet series to help you go from knowing nothing about crochet to confidently reading patterns and making your own projects.

You'll learn the essential crochet stitches and techniques step by step, with simple lessons designed to help you practice as you go.

Start Learning to Crochet Now

Happy crocheting!

Next
Next

Fixing Common Crochet Mistakes: A Beginner's Troubleshooting Guide