Fixing Common Crochet Mistakes: A Beginner's Troubleshooting Guide
Something doesn't look right in your crochet?
Don't panic.
Most beginner crochet problems are surprisingly easy to fix once you know what to look for. This guide walks through some of the most common questions beginners have, from counting rows and finding your stitches to curling fabric and uneven edges.
Learning crochet with my 10-Week Learn to Crochet series? This troubleshooting guide is here to help you when something doesn't look quite right along the way. If you found this post through search or another tutorial, you can use it as a standalone reference, or start with my Learn to Crochet series, where I walk you from complete beginner to finished project in 10 weeks with lessons taught by a Craft Yarn Council-certified crochet instructor.
Watch the Video
If you're having trouble with your crochet, start with the video below. Then use the sections in this post to find more information about the specific problem you're having.
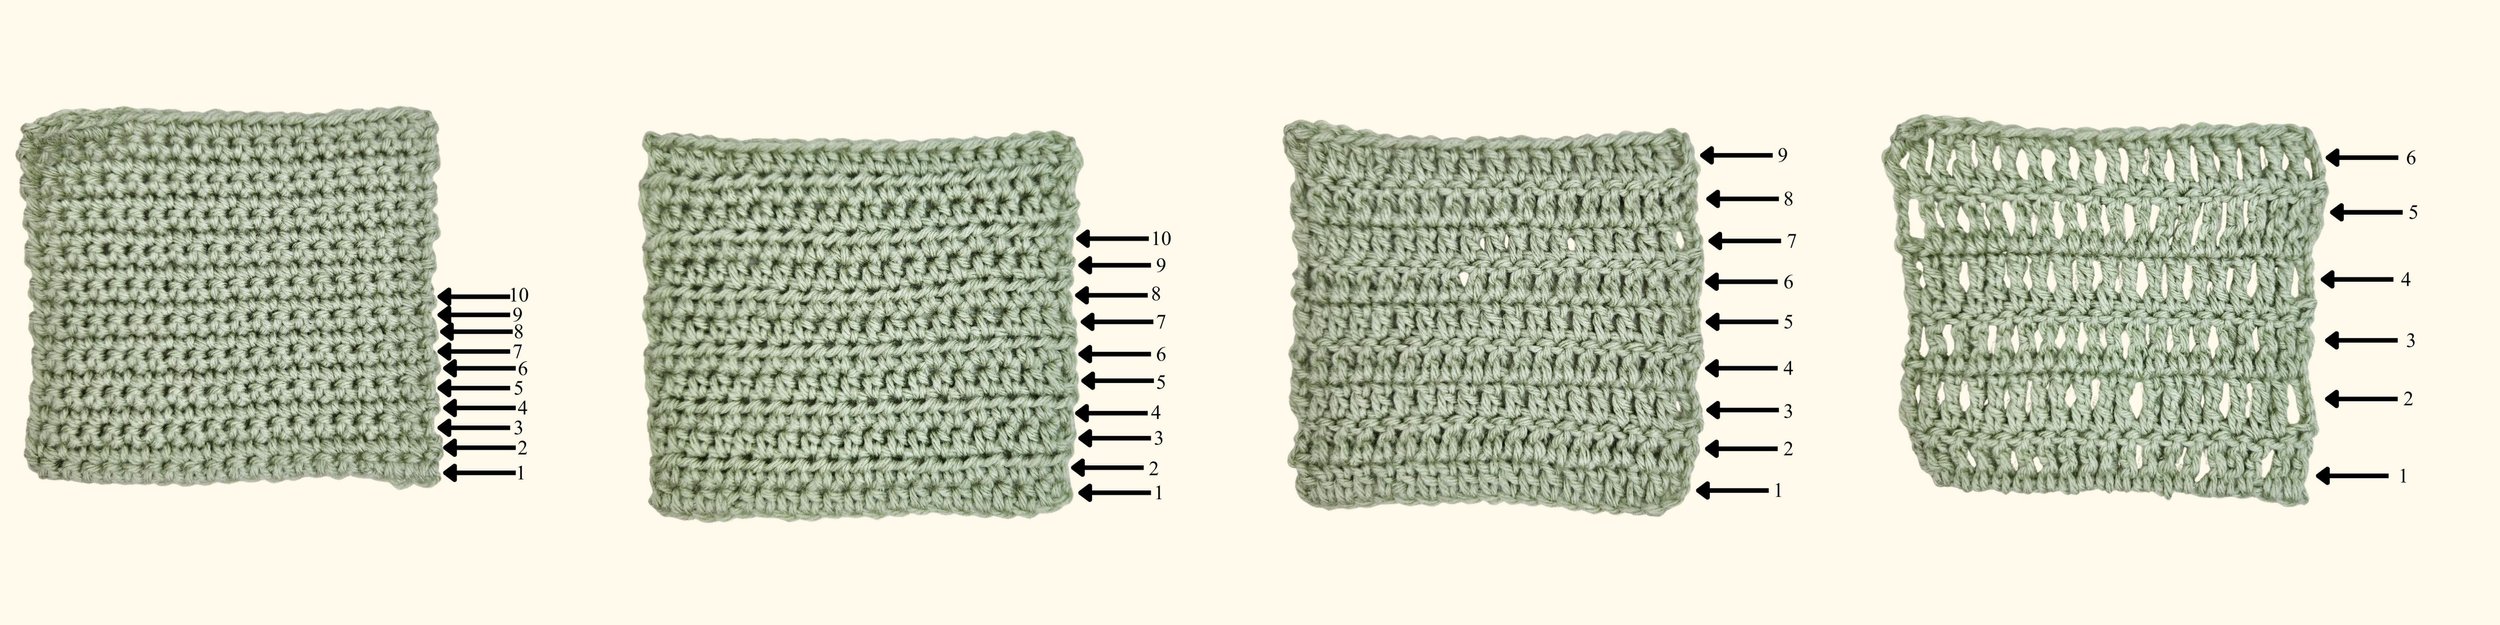
How Do I Count My Rows?
Counting stitches tells you how many stitches are in a row. Counting rows tells you how many rows of crochet you've completed.
Start at the bottom edge of your project and count upward.
The way individual rows look will vary depending on the stitch you're using. Single crochet, half double crochet, double crochet, and treble crochet all have different proportions and visual structures, so don't worry if your rows don't look exactly like someone else's.
The important thing is to identify the repeated structure of your stitch and count each completed row.
A helpful tip
If you're following a pattern and trying to figure out which row you're on, count from a clearly defined edge rather than trying to identify a row somewhere in the middle.
If you've put your project down for a while, you can also use a stitch marker or scrap piece of yarn to mark your place.
Why Are My Edges Not Straight?
If your project starts out straight but gradually gets wider or narrower, your stitch count is probably changing from row to row.
Common causes include:
Skipping a stitch
Working twice into the same stitch
Missing the first or last stitch
Miscounting your turning chain
Working into the wrong part of a stitch
Accidentally working into a space instead of a stitch
First, count your stitches to see if your stitch count has changed.
If it has, look back at your rows and find where the count first became incorrect.
Don't try to correct the problem by adding or skipping a stitch in the next row. Instead, pull out your work row by row by pulling on the working yarn to unravel the stitches until you get back to a row with the correct stitch count. Then begin again from there.
This might mean undoing several rows, but that's okay.
Frogging is part of learning crochet.
Why Don't I Have the Right Number of Stitches?
If you're consistently having trouble getting the correct stitch count, the beginning and end of your rows are a good place to look first.
When you're learning, it's very easy to accidentally skip the first or last stitch, especially when you're working taller stitches (double crochet or treble crochet) and the turning chain counts as a stitch.
Use stitch markers while you're learning
Place a stitch marker in the first stitch and last stitch of every row.
This gives you a clear visual reminder of exactly where your row begins and ends, making it much harder to accidentally skip a stitch or work twice into the same stitch.
And there's no rule that says you have to stop using stitch markers once you're more experienced. If they make your crochet easier, keep using them.
At the end of each row, count your stitches and make sure the number matches your pattern.
If your count is wrong, don't just keep going and hope it works itself out. Stop and figure out where the count changed before continuing.
Why Can't I Find the First or Last Stitch of My Row?
You're not alone. Finding the first and last stitch is one of the hardest things to see when you're learning crochet.
The stitches can look different depending on which stitch you're working, and the beginning of a row can be especially confusing when you're working taller stitches or when the turning chain counts as a stitch.
Start by looking for the top of the stitch
For most basic stitches worked into an established row, look for the V-shaped top of the stitch. The first and last stitches are at the very edges of that row, but they can sometimes blend into the turning chain or the edge of the fabric.
If you're not sure, compare the stitch you're trying to find with the stitches next to it. Look for the same V-shaped structure rather than just looking for a hole where your hook might fit.
Your individual stitch tutorials (single crochet | half double crochet | double crochet | treble crochet) show exactly what the first and last stitch look like for each stitch.
And remember: this is exactly why stitch markers are so useful while you're learning. Once you've identified your first and last stitch, mark them so you don't have to find them from scratch on every row.
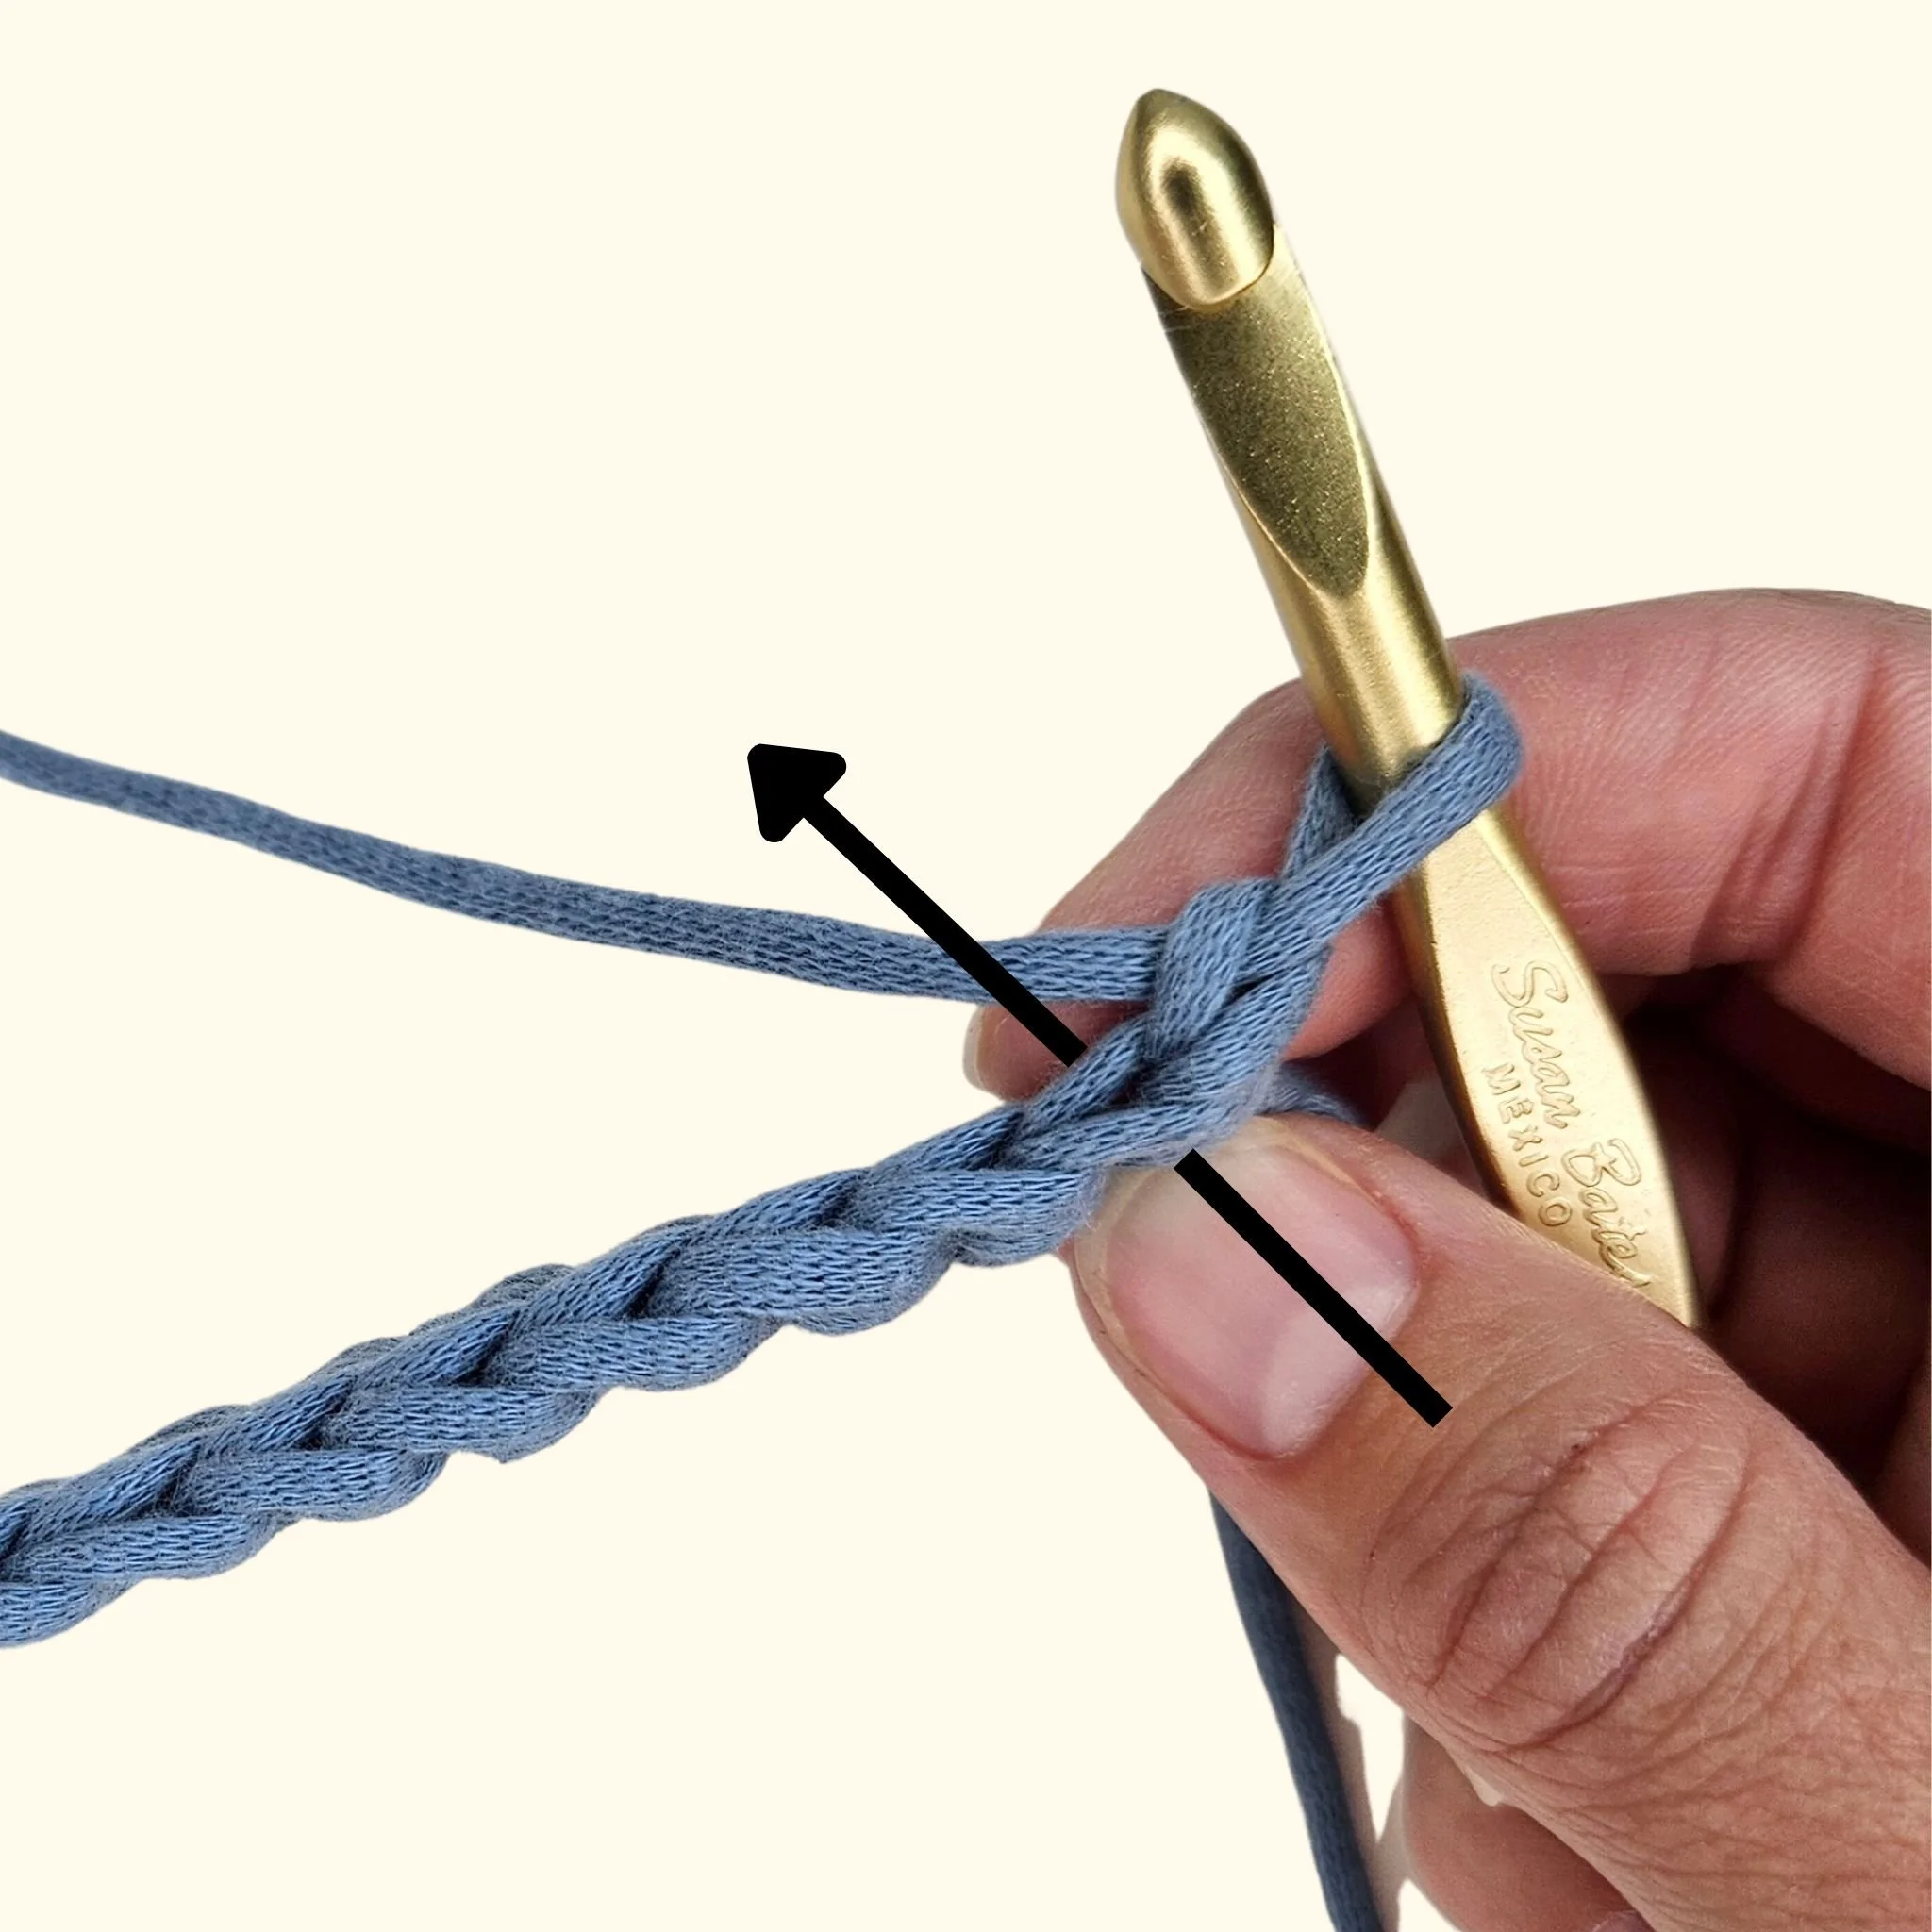
Where Do I Put My Hook?
This is one of those questions that becomes much easier once you know what you're looking at.
For most basic crochet stitches, the top of the stitch looks like a V.
Unless your pattern tells you otherwise, you'll generally insert your hook under both loops that make up the V.
But there are different ways of working into a foundation chain than working into an established row.
For an established row, make sure you're looking at the actual stitch, rather than accidentally inserting your hook into a gap between stitches.
Why Can't I Get My Hook Into My Stitches?
If your hook won't easily slide into a stitch, the most common reason is too tight tension.
Try relaxing your working yarn and avoid pulling each stitch tightly against your hook.
Your hook should be able to move through the stitch without a struggle.
If you're consistently having trouble, try:
Relaxing your grip
Loosening your yarn tension
Making sure you're using the correct hook size for your yarn
Practicing a few rows without worrying about making them perfect
Remember: your stitches don't need to be tight to be good crochet.
Why Is My Crochet Curling?
A little curling can be completely normal, especially while you're learning.
The shape of your fabric is affected by:
The stitch you're using
Your tension
Your hook size
The type of yarn
Where you're inserting your hook
Some crochet stitches naturally create more curl or tension than others.
Before assuming you've done something wrong, check your stitch count and make sure you're following the pattern correctly.
If your stitch count is correct, your tension is reasonably consistent, and the pattern doesn't indicate a problem, don't panic over a little curling while you're working.
Your finished project may look very different once you've completed more rows or blocked it.
→ Learn more: How to Block Crochet
Why Aren't My Stitches Perfect?
Because you're learning. Seriously.
Your first stitches probably won't all look exactly the same. Some will be tighter. Some will be looser. Your tension will change while you learn the movements.
That's normal.
As you practice, your hands will start making the movements more automatically, and your tension will become more consistent.
Focus on these things first:
Correct stitch count
Your number of stitches should match the pattern.
Correct placement
Your hook should be going into the correct part of the stitch.
Consistent rows
Your project should generally be the shape and size the pattern expects.
Don't spend your first projects trying to make every stitch look identical.
Consistency comes with practice.
Why Doesn't My Crochet Look Like the Picture in the Pattern?
If you've followed the instructions correctly but your finished fabric doesn't look quite like the designer's, you may not have made a mistake at all.
The way crochet looks and behaves is affected by much more than the stitch you're making.
Things like:
can all change the appearance, drape, size, and texture of your finished fabric.
That's why learning crochet isn't just about memorizing stitches. Understanding your yarn, hook, gauge, and tension gives you the information you need to understand why your crochet behaves the way it does.
If you landed here because you're learning crochet from a collection of individual YouTube videos, tutorials, or classes, I'd recommend going through my Learn to Crochet series from the beginning.
You can also sign up for my 10 Week Learn to Crochet email course to get bite-sizes lesson delivered right to your inbox intended to take you from complete beginner to confidently completing a crochet project in 10 weeks, while teaching the foundational information that helps everything else make sense, not just how to make the next stitch.
How to Join a New Skein of Yarn or Remove a Knot
Running out of yarn or found a knot in your skein? You can join a new strand of yarn without tying a knot in your work.
Step 1: Prepare Your Yarn
If you're running out of yarn, continue crocheting until you have approximately 6 - 8 inches (15 - 20 cm) remaining.
If you encounter a knot in your skein, cut it out, leaving a 6 - 8 inch (15 - 20 cm) tail on the yarn you're currently working with.
Step 2: Work Your Final Stitch
Begin your next stitch with the old yarn, but stop just before the final pull-through. Here's where to stop for each stitch:
Single Crochet (sc): Insert your hook into the next stitch, yarn over, and pull up a loop. Stop with 2 loops on your hook.
Half Double Crochet (hdc): Yarn over, insert your hook into the next stitch, yarn over, and pull up a loop. Stop with 3 loops on your hook.
Double Crochet (dc): Yarn over, insert your hook into the next stitch, yarn over, and pull up a loop. Yarn over and pull through 2 loops. Stop with 2 loops remaining on your hook.
Treble Crochet (tr): Yarn over twice, insert your hook into the next stitch, yarn over, and pull up a loop. Yarn over and pull through 2 loops twice. Stop with 2 loops remaining on your hook.
Slip Stitch (sl st): Insert your hook into the next stitch and stop before pulling the yarn through.
Step 3: Join Your New Yarn
Leaving a 4 - 6 inch (10 - 15 cm) tail on your new strand of yarn, yarn over with the new yarn and complete the final pull-through of your stitch.
Gently tighten the yarn tails to adjust your tension, then continue crocheting with the new yarn.
Step 4: Weave in Your Ends
Once you've worked a few more stitches (or let’s be honest, when you’re done with your project), use a tapestry needle to weave in both yarn tails separately on the wrong side of your work.
Tip: There's no need to tie the two strands together. Weaving in your ends securely will keep your join in place without leaving a bulky knot in your fabric.