How to Make a Crochet Magic Loop: Step-by-Step Guide to Perfecting the Magic Circle Technique
Frequently, I've encountered crocheters expressing frustration with mastering the magic loop, also referred to as the magic circle. This frustration often leads them to disregard the technique altogether and seek alternative methods. In fact, I've encountered this situation so frequently that when one of my patterns calls for a magic loop, I include alternative instructions for those who prefer not to use it. However, mastering this versatile technique opens up a world of possibilities for your crochet projects.
In this comprehensive guide, I will walk you through the step-by-step process of creating a flawless magic loop, along with troubleshooting tips to help you overcome common challenges. So grab your crochet hook and yarn, and let's discover the magic of the magic loop!
Pin this tutorial so you don’t lose it:

Just a heads-up: This blog post may contain affiliate links. Don't worry, though - these links are a win-win! They help support my site without costing you a penny extra. So, if you find something you love, clicking through won't just benefit me and my family, it'll also help you discover great products and resources!
Understanding the Magic Loop
Let’s first establish a clear understanding of the magic loop’s significance and functionality within crochet projects. The magic loop is a foundational crochet technique utilized to create a tightly closed loop at the beginning of a project, particularly beneficial for projects that require a seamless, closed center, such as amigurumi and granny squares.
The biggest advantage of using a magic loop is its adjustability. Unlike traditional starting methods where you chain a few stitches and then slip stitch back into the first chain to form a loop, the magic loop allows for precise control over the size and tightness of the loop. This ensures a snug fit for subsequent stitches and eliminates the unsightly hole often associated with other starting methods.
So let’s learn how to create the magic loop.
Video Tutorial
I have a quick video tutorial on YouTube if you are more of a visual learner.
Crochet Magic Circle: Step-by-Step Guide
With your thumb, hold the dead end/tail of the yarn against the palm of your hand. Wrap the yarn around the back of your hand and across the palm again, making an “X” shape on the palm of your hand.
Rotate your hand so the back of your hand is facing up. You should see 2 strands of yarn.

With your crochet hook facing down, go underneath the first strand of yarn and grab the second strand with your hook.
Use your crochet hook to pull the strand of yarn that was grabbed underneath the first strand of yarn.
As you pull the strand of yarn underneath the first, twist your crochet hook towards you so that it is now facing up.
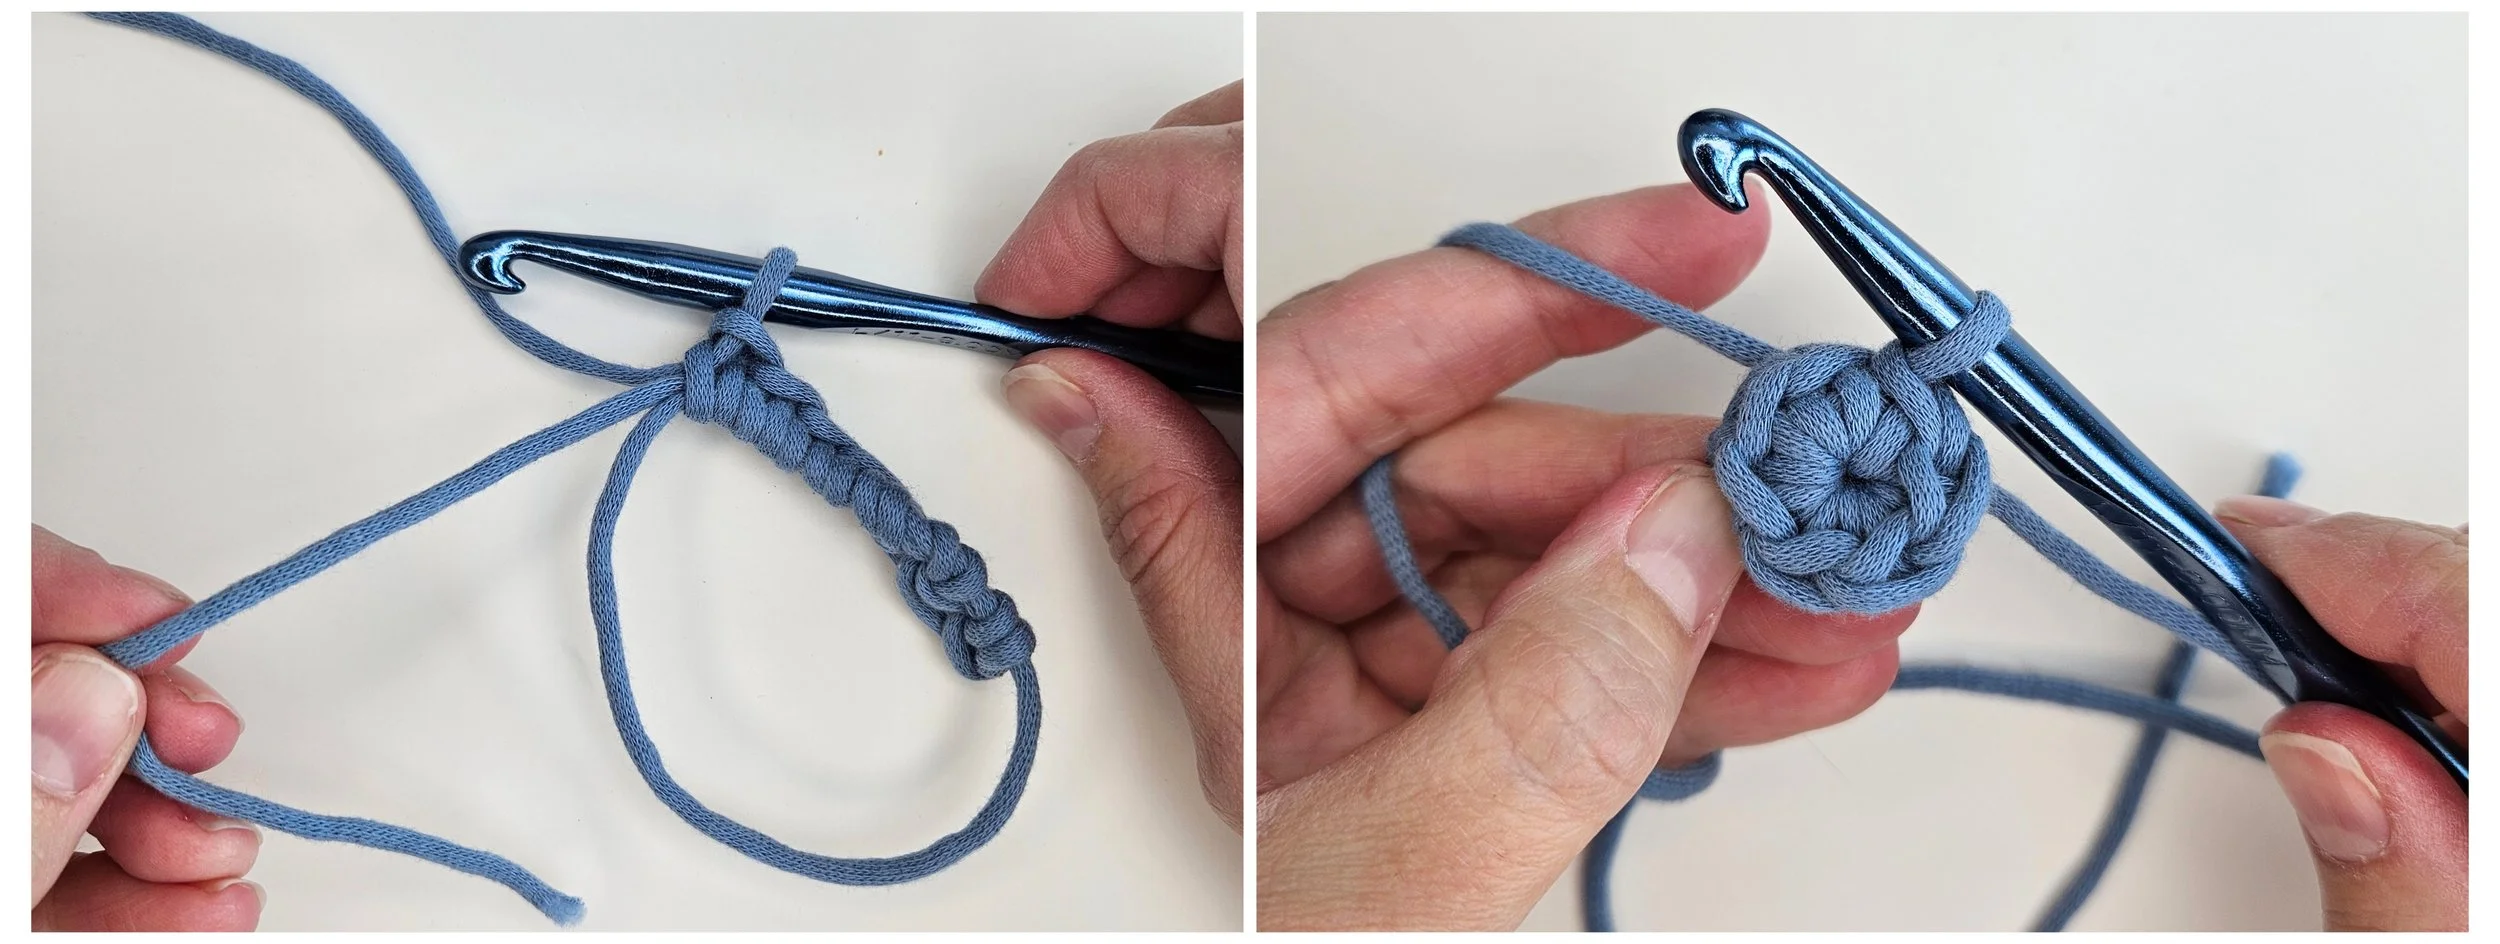
Use your hook to grab the working yarn (the yarn attached to the ball or skein) and pull it through the loop that was just made.
Chain 1 and work your desired number of stitches directly into the magic circle, making sure to work over both the tail and the working yarn.

Once you've completed your stitches, grab the tail end of the yarn and gently pull it tight to close the circle.
Don’t forget to weave in the tail end of the magic circle. If you forget this step, your magic circle could loosen and open with time.
Troubleshooting Common Problems
Like any crochet technique, mastering the magic circle requires practice and patience. Don't be discouraged if you encounter difficulties initially – troubleshooting and refining your technique is all part of the learning process.
There are four common problems with a magic circle:
1. Loose Center: ending up with a loose or gaping center that can affect the overall appearance of your project.
Solution: Tighten the magic circle by gently pulling on the tail end of the yarn after completing the initial chain stitch. Adjust the tension gradually until the center is snug but not overly tight. You also want to ensure the magic circle is completely closed after you have finished your project, right before weaving in the tail end of the circle.
2. Uneven Tension: Inconsistent tension while crocheting can cause the magic circle to loosen over time. If the stitches worked into the magic circle are too loose, they may not hold the circle tightly closed.
Solution: To achieve uniform stitches and prevent uneven tension, pay close attention to your tension as you work around the magic circle. Keep your yarn tension consistent throughout the process by maintaining a steady grip on both the tail and working yarn.
3. Not working Around the Tail End and Loop: When working your stitches, ensure you are working around both the tail end and the loop of the magic circle to secure it properly. Each stitch needs to be worked around both strands to prevent the circle from loosening or unraveling.
4. Incorrect Technique: If the magic circle is not properly closed or secured at the end of the crocheting process, it may loosen over time.
Solution: If you're having trouble closing the magic circle, ensure that you've worked enough stitches into the circle to provide adequate tension (to create a flat circle, typically 6 single crochet stitches, 8 half double crochet stitches, or 12 double crochet stitches are needed.) After completing your stitches, firmly pull on the tail end of the yarn to cinch the circle closed. You can also use your hook to help manipulate the stitches and tighten the center further if needed.
Also, make sure to securely weave in the tail end of the magic circle so it does not come undone. You can also take the tail of the magic circle and weave it through the base of all the stitches that were worked into the circle to “double” up on the initial loop.
Finishing Touches
Congratulations! You've successfully learned how to crochet a magic loop and troubleshoot common issues. With practice and patience, the magic loop technique will become an invaluable tool in your crochet repertoire. Happy crocheting!
