How to Fasten Off & Weave in Ends: Finishing Your Crochet
Welcome to Learn to Crochet!
This lesson is part of my Learn to Crochet email course, where I walk you through the fundamentals of crochet step by step while you make your own market bag.
If you're following along with the email course, this is Week 6. If you found this lesson on your own, welcome! You can work through the lessons at your own pace or join the free email course to have each lesson delivered to your inbox.
Let's get started!
You've finished crocheting your project! Before you can call it done, there are a few simple finishing steps that will secure your stitches and give your project a polished look.
Watch the Video Tutorial
Watch the video below, then follow along with the written instructions and photos while you finish your project.
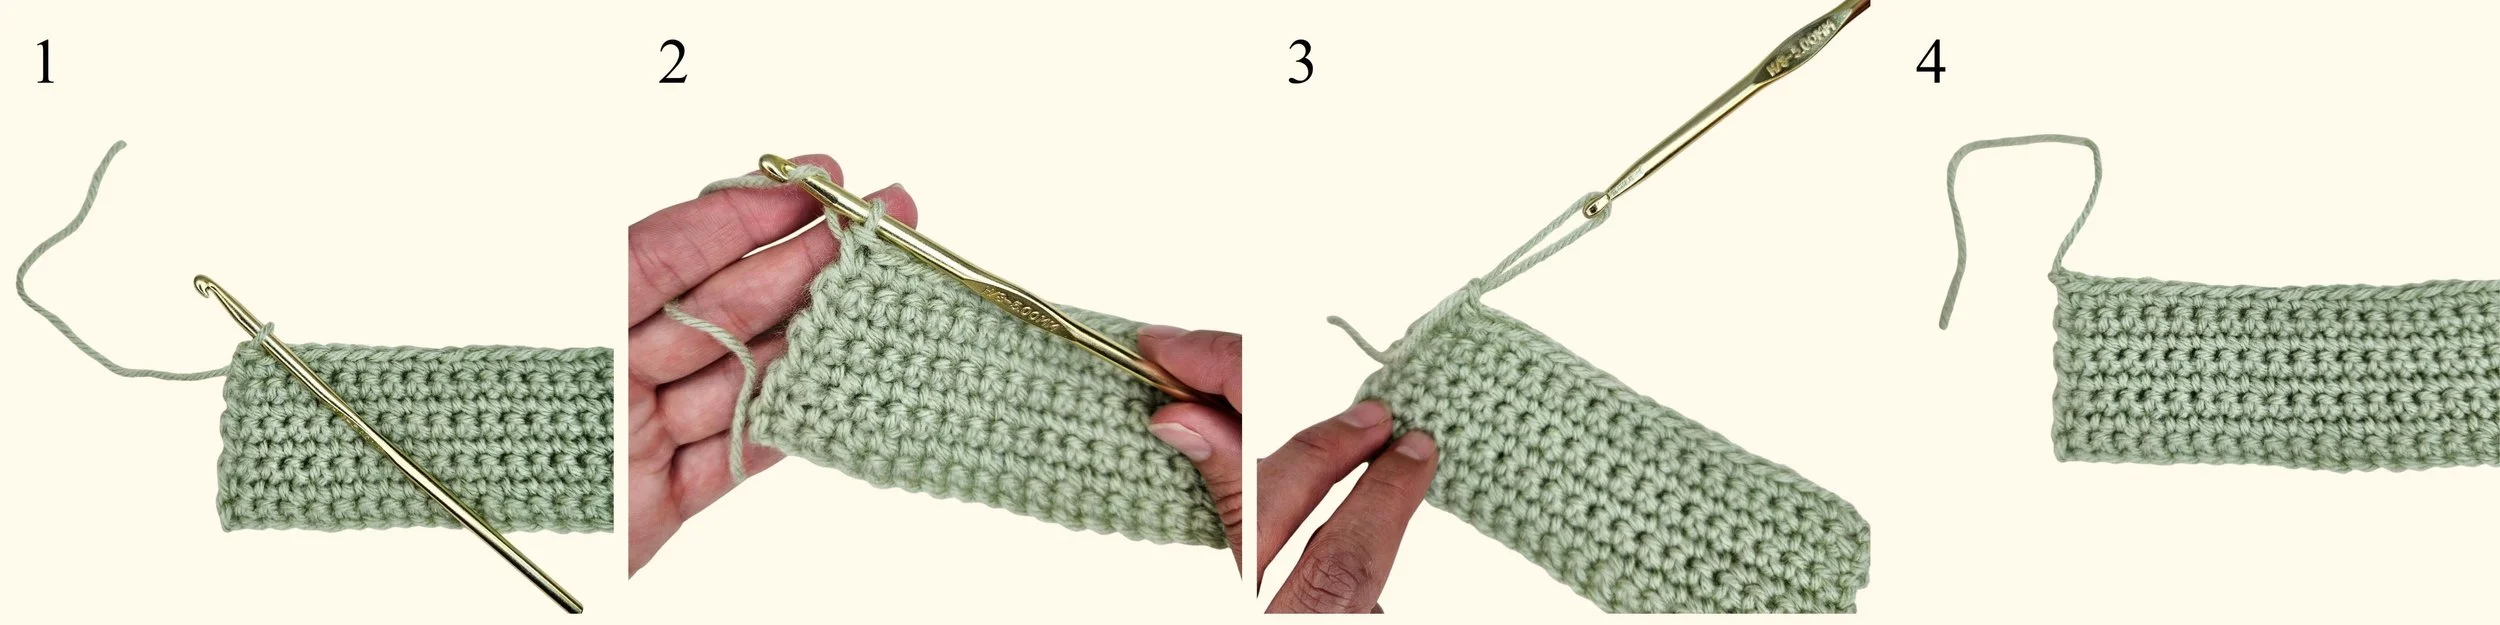
How to Fasten Off Crochet
When your pattern tells you to fasten off, you're securing your final stitch so your work doesn't unravel.
Here's how:
Step 1: Cut the Yarn
Cut your working yarn, leaving a tail about 6 inches long.
You want enough yarn left to weave in securely.
Step 2: Yarn Over
Yarn over with the yarn tail.
Step 3: Pull Through
Pull the yarn through the loop on your hook.
Continue pulling until the entire yarn tail has been pulled through the loop.
Step 4: Tighten
Gently pull the yarn tail to secure the final stitch.
Don't pull so tightly that you distort the edge.
You've now properly fastened off your crochet.
How to Weave in Yarn Ends
Fastening off secures your final stitch, but you'll still have a yarn tail that needs to be hidden and secured.
Weave your ends into the wrong side of your project whenever possible. This keeps the front of your work clean and prevents the yarn tail from showing.
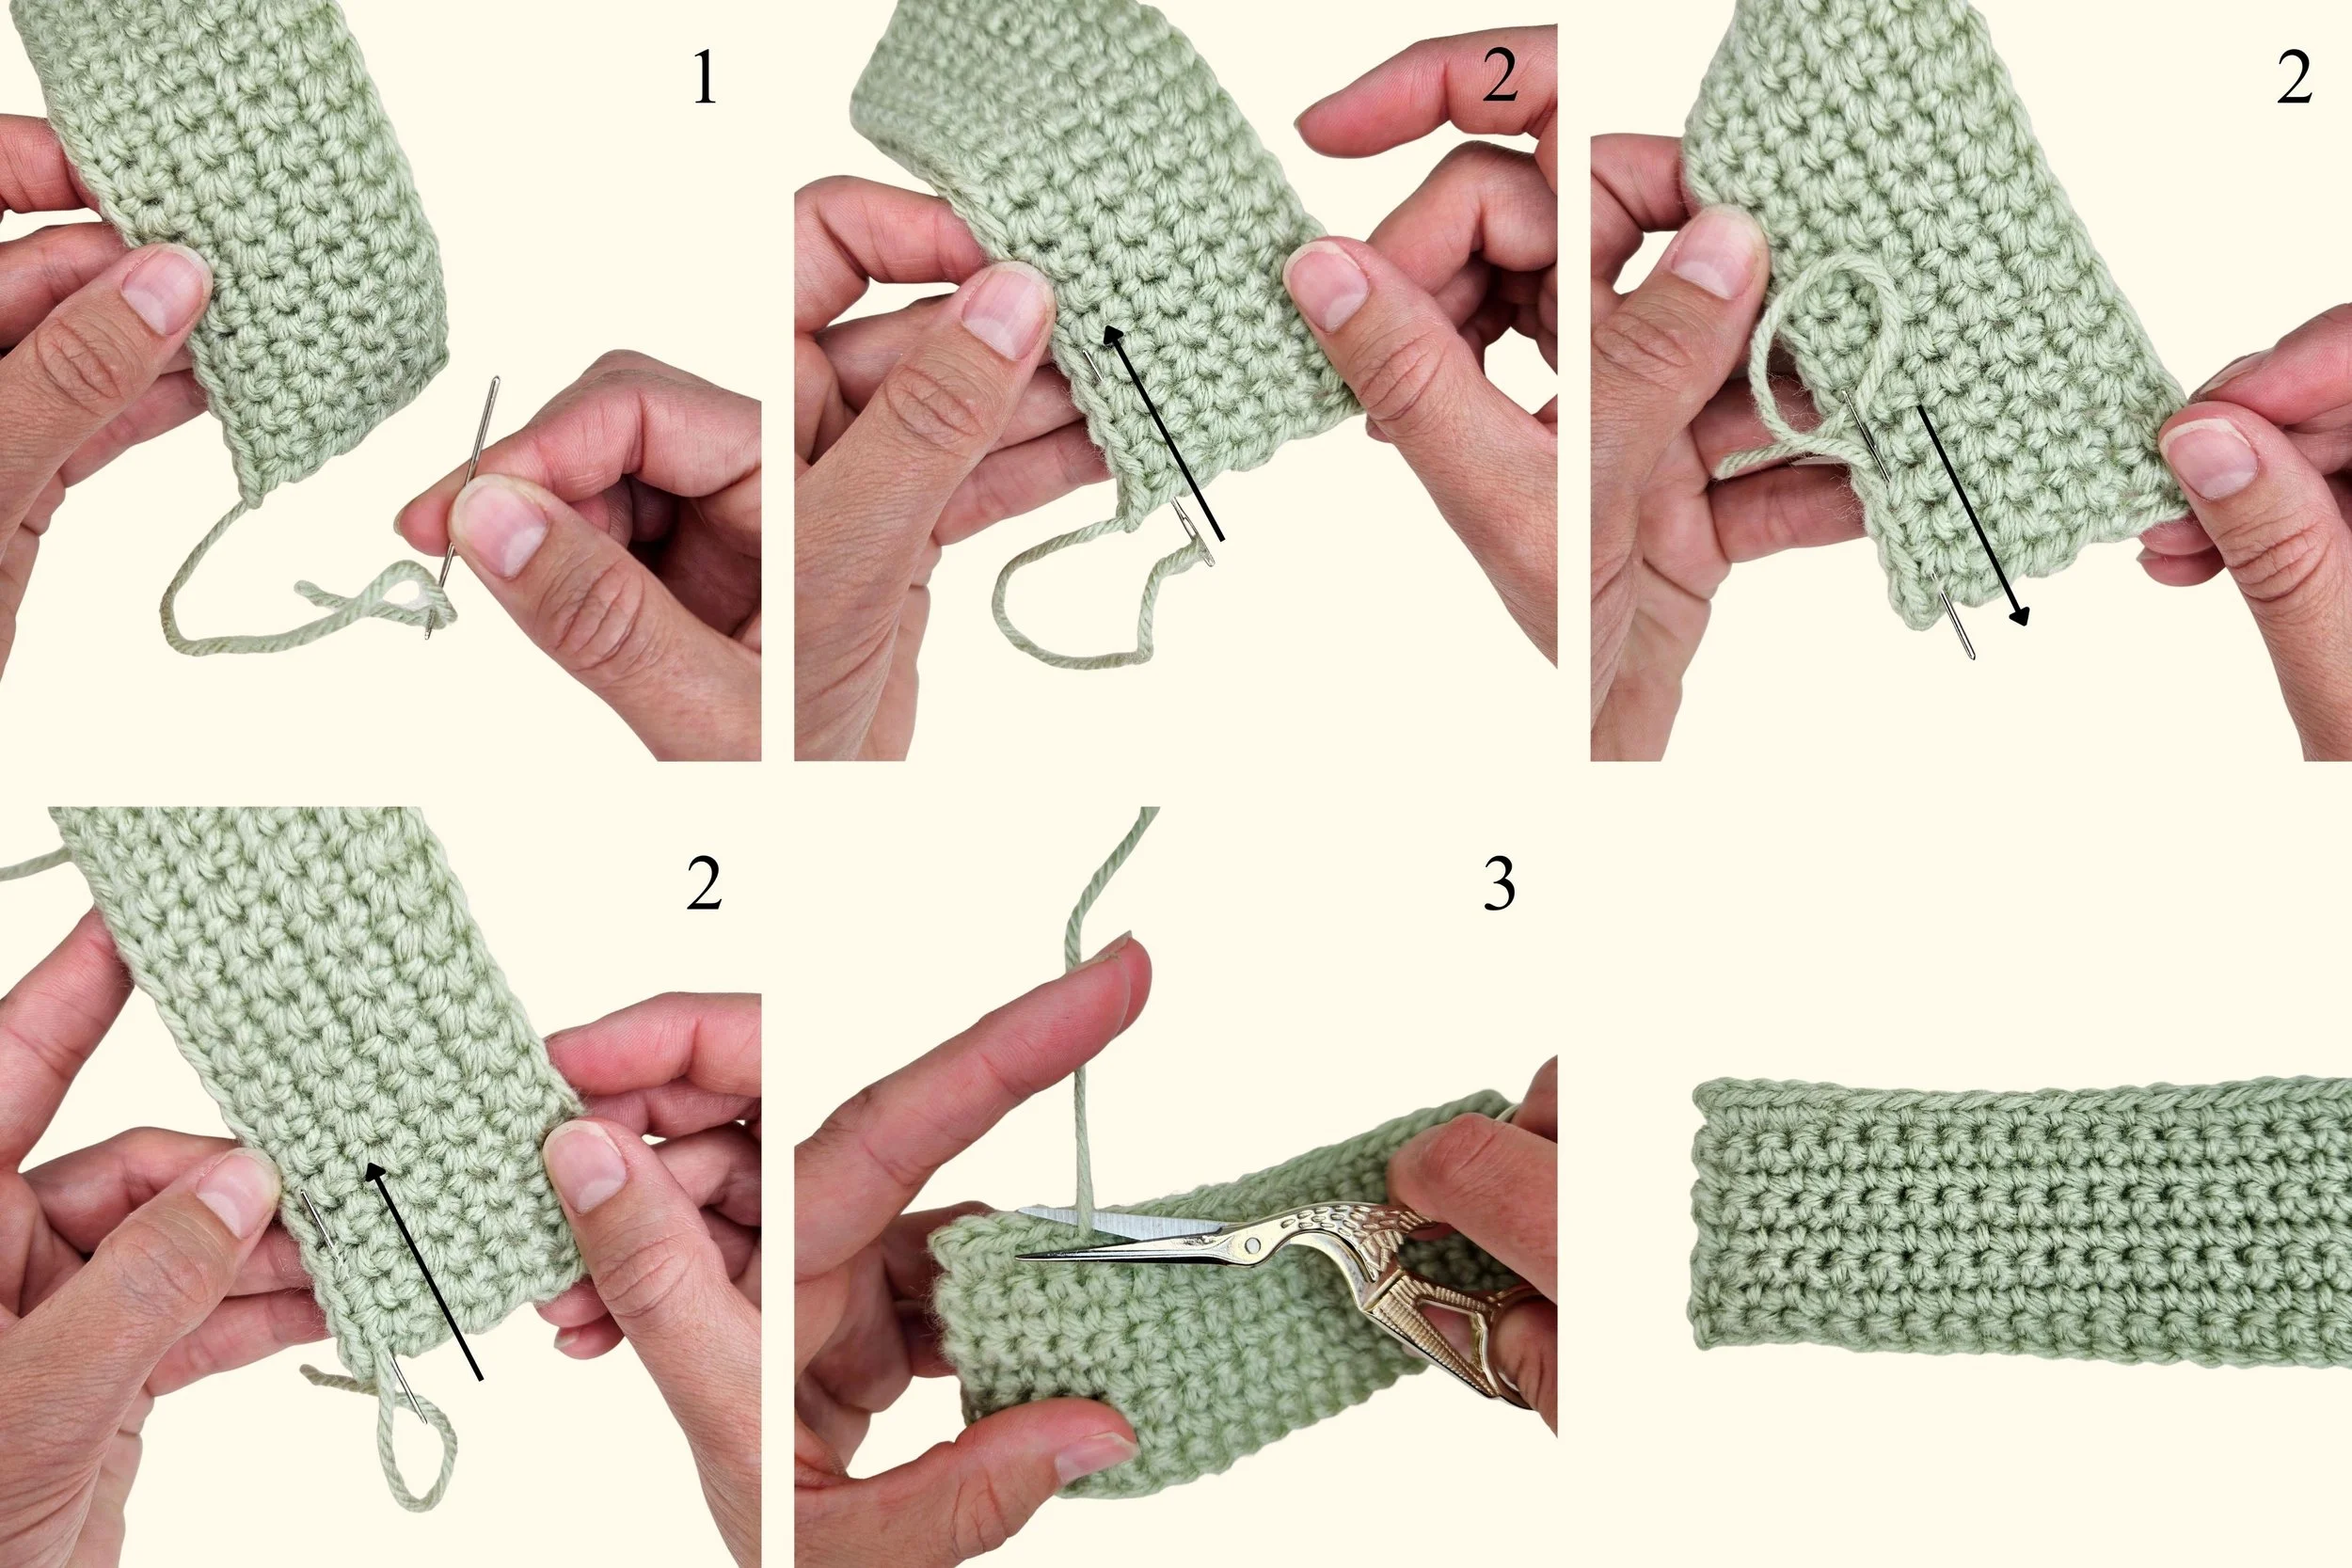
Step 1: Thread Your Yarn Needle
Thread the yarn tail through a blunt-tipped yarn needle (also known as a darning or tapestry needle).
A blunt yarn needle makes it easier to work through your stitches without accidentally splitting the yarn.
Step 2: Weave in Three Directions
Instead of simply running the yarn in one direction, weave the end through your stitches for about an inch, changing directions 3 times.
Work the needle:
About an inch in one direction
Back in the opposite direction
Then in another direction
Changing directions anchors the yarn securely within the stitches and makes it much less likely to work its way loose.
Keep the yarn relaxed as you weave. Pulling it too tightly can pucker or distort your fabric.
Step 3: Trim the Excess
Once the end has been securely woven in, trim the remaining yarn close to the fabric.
Be careful not to cut the stitches themselves.
Your yarn end should now be secure and hidden within the fabric.
Should I Tie a Knot?
Usually, you don't need to.
Properly weaving in an end is generally enough to secure your yarn without creating a noticeable bump in your fabric.
However, there are times when a knot can provide extra security, especially in areas of a garment that receive a lot of wear.
For example, you may choose to tie a small knot at a joining point in the underarm area of a garment, where a sleeve has been joined to the body and the seam will experience extra stress.
If you do use a knot, keep it small and secure, then weave in the remaining yarn tail as usual.
Don't Pull Your Ends Too Tight
It's easy to accidentally pull the yarn too tightly while weaving in ends.
Try to keep the yarn at the same tension as the surrounding fabric.
If you pull too tightly, you can:
Pucker the fabric
Distort the stitches
Make the finished piece less flexible
Your woven-in end should be secure, but the fabric should still look and feel natural.
How Long Should My Yarn Tail Be?
When you're ready to fasten off, leave yourself enough yarn to weave in comfortably.
A 6-inch tail is a good starting point for most projects, but you may want to leave more for:
Thick yarn
Large stitches
Areas that receive a lot of wear
Joining or sewing pieces together
It's much easier to trim an extra-long tail than to work with one that's too short.
What About Blocking?
Blocking is another useful finishing technique that can even out your stitches, help shape your project, and give it a more polished appearance.
But blocking isn't necessary for every crochet project, and it's enough of a topic to deserve its own lesson:
How to Block Crochet
Your Project Is Finished!
Once you've fastened off, securely woven in your ends, and trimmed the excess yarn, your crochet project is officially finished.
These final steps only take a few minutes, but they make a big difference in how polished and durable your finished work looks.
And now you know how to take your project from "I finished crocheting!" to "It's actually finished."
Now that you know how to finish your crochet project and you have all the foundational skills you need to start following crochet patterns, If you've been wondering what all those abbreviations, numbers, and instructions in a crochet pattern actually mean, the next lesson will walk you through how to read a crochet pattern step by step.
Continue Learning
If you're learning crochet on your own, continue with the next lesson in the Learn to Crochet series: How to Read a Crochet Pattern.
Taking the email course? Your next lesson and practice assignment will be in your next email.