Posey the Bunny Lovey
There's something so special about a handmade lovey—the perfect mix of cuddly and comforting, with a little touch of magic. Meet Posey the Bunny Lovey, a soft and snuggly friend designed to bring joy to little ones! With a delicate shell stitch blanket for the body and the sweetest sleepy bunny face, Posey is sure to become a cherished companion. This pattern is beginner-friendly with just enough detail to keep things interesting, and whether you’re making it for your own little one or as a heartfelt gift, it’s bound to be a hit. Ready to hop into the pattern? Let’s get started!
Remember to PIN this tutorial to save it for later:

Just a heads-up: This blog post may contain affiliate links. Don't worry, though - these links are a win-win! They help support my site without costing you a penny extra. So, if you find something you love, clicking through won't just benefit me and my family, it'll also help you discover great products and resources.
Purchase the ad-free pattern
Enjoy a seamless crochet experience with the ad-free, printable PDF of the Posey the Bunny Lovey Pattern!
This premium version provides a clear, easy-to-read format with an exclusive picture tutorial, making it perfect for printing and crafting without distractions.
Difficulty
This is an Easy level pattern. A simple stitch pattern and minimal shaping is used to create this lovey.
Finished Measurements
Blanket body of the bunny is 28 cm x 28 cm
Head circumference is 30 cm
Yarn
You will need the following amounts of a DK/light weight (3) yarn:
Color A (blanket body, tips of ears)
meters: 280
grams: 160
Color B (head, paws, ears)
meters: 190
grams: 110
Small amount of black cotton yarn for embroidering the face
Sample was made using Lion Brand Comfy Cotton Blend in the colors “chai latte” (Color A) and “whipped cream” (Color B). Comfy Cotton Blend yarn is a 50% cotton and 50% polyester blend, light weight (3) yarn that contains 358 meters (392 yards) per 200 grams (7 ounces).
Lion Brand’s Comfy Cotton Blend was a beloved yarn known for its soft, lightweight feel and beautiful colorways. A blend of cotton and polyester, it was perfect for warm-weather garments, baby items, and cozy accessories. Unfortunately, like many discontinued yarns, it was likely phased out due to factors like production costs, changes in demand, or the introduction of new yarn lines. While it’s always disappointing to lose a favorite, there are still plenty of great alternatives that offer similar fiber content, weight, and softness.
3 Alternatives to Lion Brand Comfy Cotton Blend
Knit Picks/WeCrochet Comfy Worsted – This cotton and acrylic blend is super soft, easy to work with, and perfect for garments, blankets, and accessories. While it's slightly heavier than Comfy Cotton Blend, it still provides great stitch definition and a gentle drape.
Hobbii Twister Solid – A lightweight cotton-acrylic blend with a soft feel and a gorgeous range of colors. This yarn has a similar fiber content and works well for breathable, wearable projects.
Bernat Softee Cotton – A DK-weight cotton-acrylic blend that offers softness and durability, making it a great substitute for lightweight projects. It’s slightly different in texture but works up beautifully in patterns that call for Comfy Cotton Blend. Use a hook one size larger than the pattern suggests to match the gauge. If you're having trouble achieving gauge with this DK-weight yarn, don't worry! Your bunny lovey will still turn out adorable—it may just be slightly smaller.
Hook Size and Notions
5 mm crochet hook
4.5 mm crochet hook
Polyfil (or another stuffing material)
Stitch markers
Tapestry needle
Scissors


Gauge
4 double crochet fans and 11 rows in a 10 cm (4") square.
Starting with a 5 mm hook, chain a multiple of 4 + 1 stitches. Chain enough stitches for the finished gauge swatch to measure a little over 10 cm (4").
Row 1 dc in 5th ch from hook, *sk next ch, sc in next ch, sk next ch, (dc, ch 1, dc) in next ch, ch 1, turn
Row 2 sc in ch 1 sp, *(dc, ch 1, dc) in next sc st, sc in next ch 1 sp* rep across, working last sc in the 4th tch, ch 4, turn
Row 3 dc in 1st sc st, *sc in ch 1 sp, (dc, ch 1, dc) in next sc st* rep across, ch 1, turn
Repeat Rows 2 - 3 until gauge swatch measures a little over 10 cm (4") in height. Measure gauge in center of swatch.
To learn more about crochet gauge click HERE.
Pattern Abbreviations
ch – chain
dc –double crochet
rep – repeat
sc – single crochet
sc2tog - single crochet 2 together
sk - skip
sl st – slip stitch
sp - space
st(s) – stitch(es)
tch – turning chain
yo – yarn over
** - repeat instructions between asterisks as many times as directed
( ) – work group of stitches all in the same chain or stitch
(These are US crochet terms from the Craft Yarn Council)
Special Stitches & Techniques
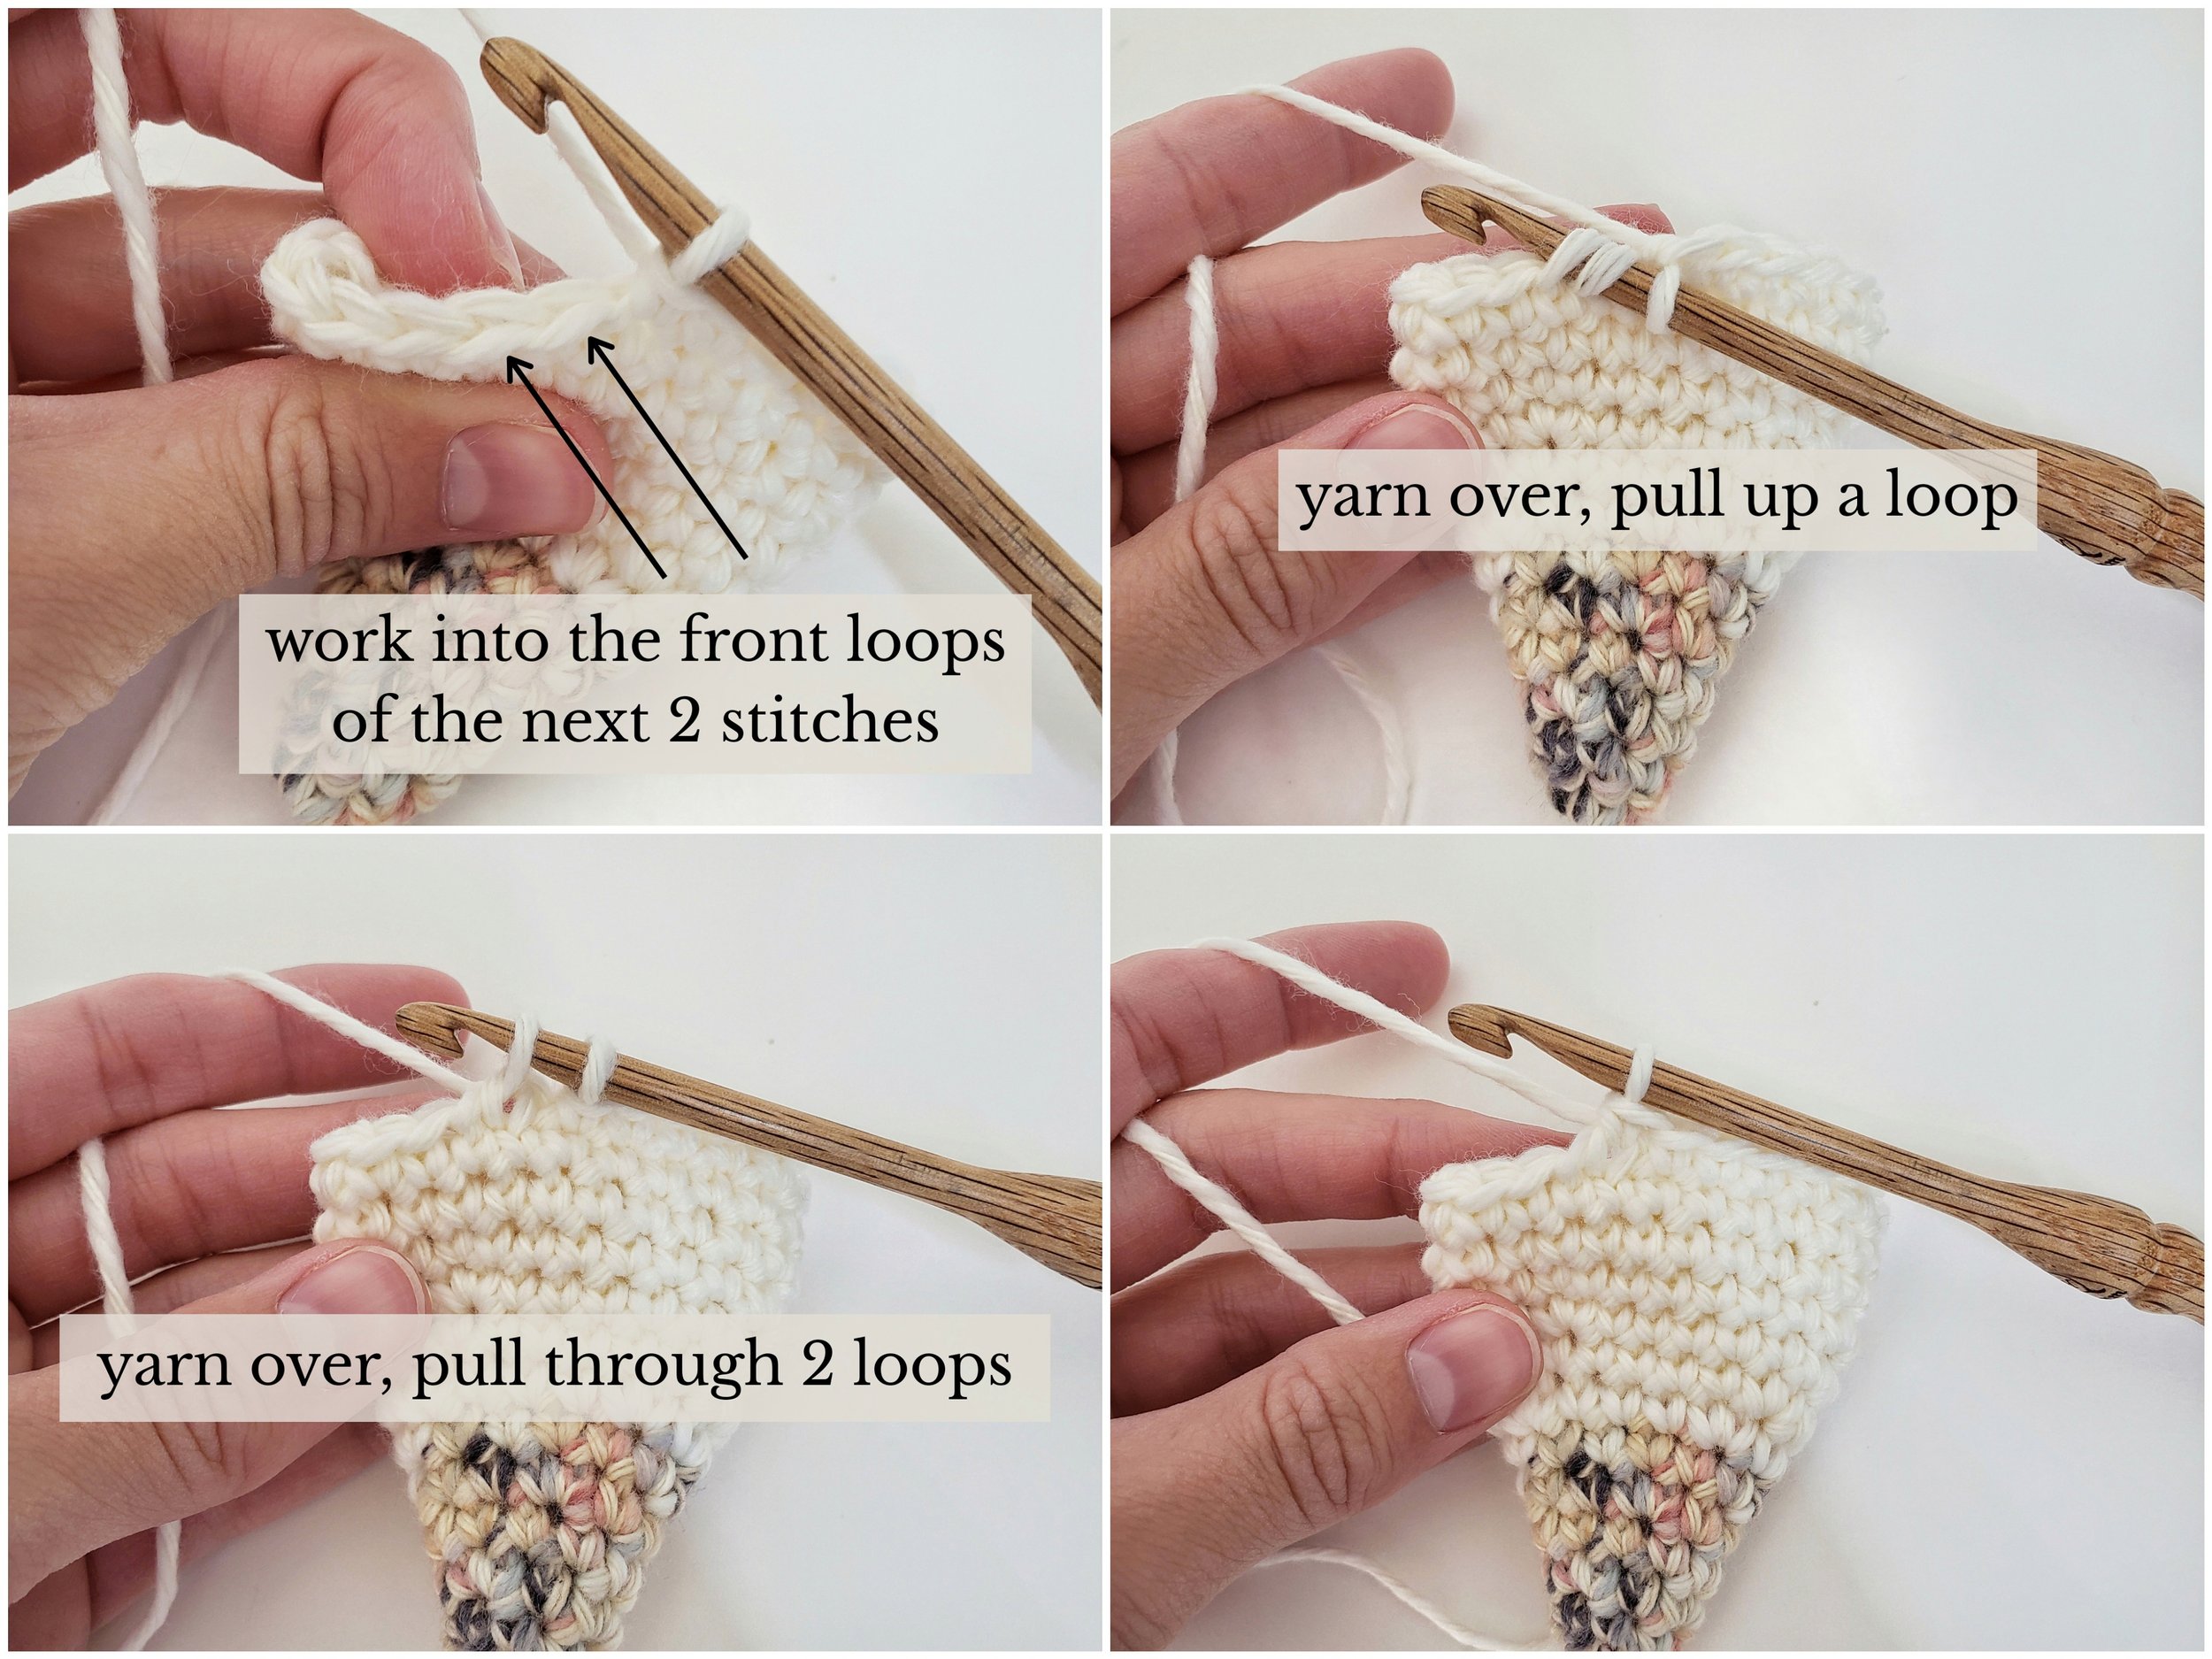
sc2tog (single crochet 2 together using the invisible decrease method for amigurumi)
1. Insert hook in the front loop only of the next stitch, insert hook in the front loop only of the next stitch (3 loops on hook).
2. yo, pull through first 2 loops on hook (2 loops on hook).
3. yo, pull through 2 loops on hook.
Color changes
1. Work stitch as normal until the last pull through of the stitch.
2. Using the new color, yo, and pull through last 2 loops on hook.

Closing the head and feet
To close the head and paws, weave the tail of yarn in and out of the front loops only of the remaining 6 stitches, and pull tightly to close.

How to crochet even circles
For simplicity, this pattern is written with increases in the round stacked on top of each other. However, to create smooth, even circles without bumps, you should vary the number of starting stitches in each round before the first increase.
This is a great technique you should be using for any amigurumi or crochet toy pattern and it is very simple once you try it.
Learn how to crochet even circles with my simple tutorial and YouTube video.
How to make a magic circle
A crochet magic circle, also called a magic ring, is a technique used to start projects worked in the round, like hats or amigurumi. It creates a tightly closed center, unlike traditional chain starts, which can leave a small hole. By crocheting your first round of stitches into an adjustable loop, you can pull the tail to close the circle completely, giving your project a clean and professional look.
I have a very simple and easy tutorial on how to create a magic circle.
Notes
The head and paws of the bunny are worked in un-joined rounds. Use a stitch marker to mark the first stitch of each round.
The body of the bunny is worked in joined rounds.
Stitch counts are given in parenthesis ( ) at the end of each row or round.
To simplify counting stitches, stitch counts for the body of the bunny are given as the number of chain 1 spaces per round.
Unlock Your Free Pattern with Grow.me!
Want to access this free crochet pattern? Simply sign up for a Grow.me account with your email address!
By signing up, you’ll get access to this pattern and future free ones, plus updates on new designs and crochet tips. It’s a great way to stay in the loop and support my work, all while enjoying awesome crochet patterns! It's super quick and easy—just follow these steps:
Enter Your Email
Type in your email and click “Unlock Pattern.” That’s it!Check Your Inbox
You might get a quick confirmation email—just click the link to finalize your account.Start Crocheting
Once you’re signed up, you can view the pattern and start crafting right away!
Please note: Grow.me manages all account-related issues, including password resets. I do not have access to help with lost passwords, so please make sure you keep your account information safe!
Pattern
Share Your Work!
You’ve put in a lot of effort to create your Posey the Bunny Lovey, and you should be proud of your achievement! Share your pictures using #stitchandhoundcrochet to connect with the community and receive support and feedback. Don’t forget to check out the social links below!
Pattern Support
If you have any questions or need a little extra help with your Posey the Bunny Lovey, don’t hesitate to reach out! Join the Stitch and Hound Facebook group! for pattern support, tips, and a wonderful community of fellow crocheters. It’s the perfect place to ask questions, share your progress, and connect with others who are crafting along with you. I’m there to offer help and support every step of the way!
