Camellia Sweater Crochet Pattern - Ruffled Kids Raglan Sweater

A young girl wearing the handmade Camellia Sweater, a crocheted kids raglan sweater with ruffles around the yoke, standing in front of a twinkling Christmas tree.

I’m so excited to share the Camellia Sweater with you—honestly, this might be my favorite pattern I’ve ever designed. It’s everything I love about crochet: soft, cozy, and just a little bit romantic.

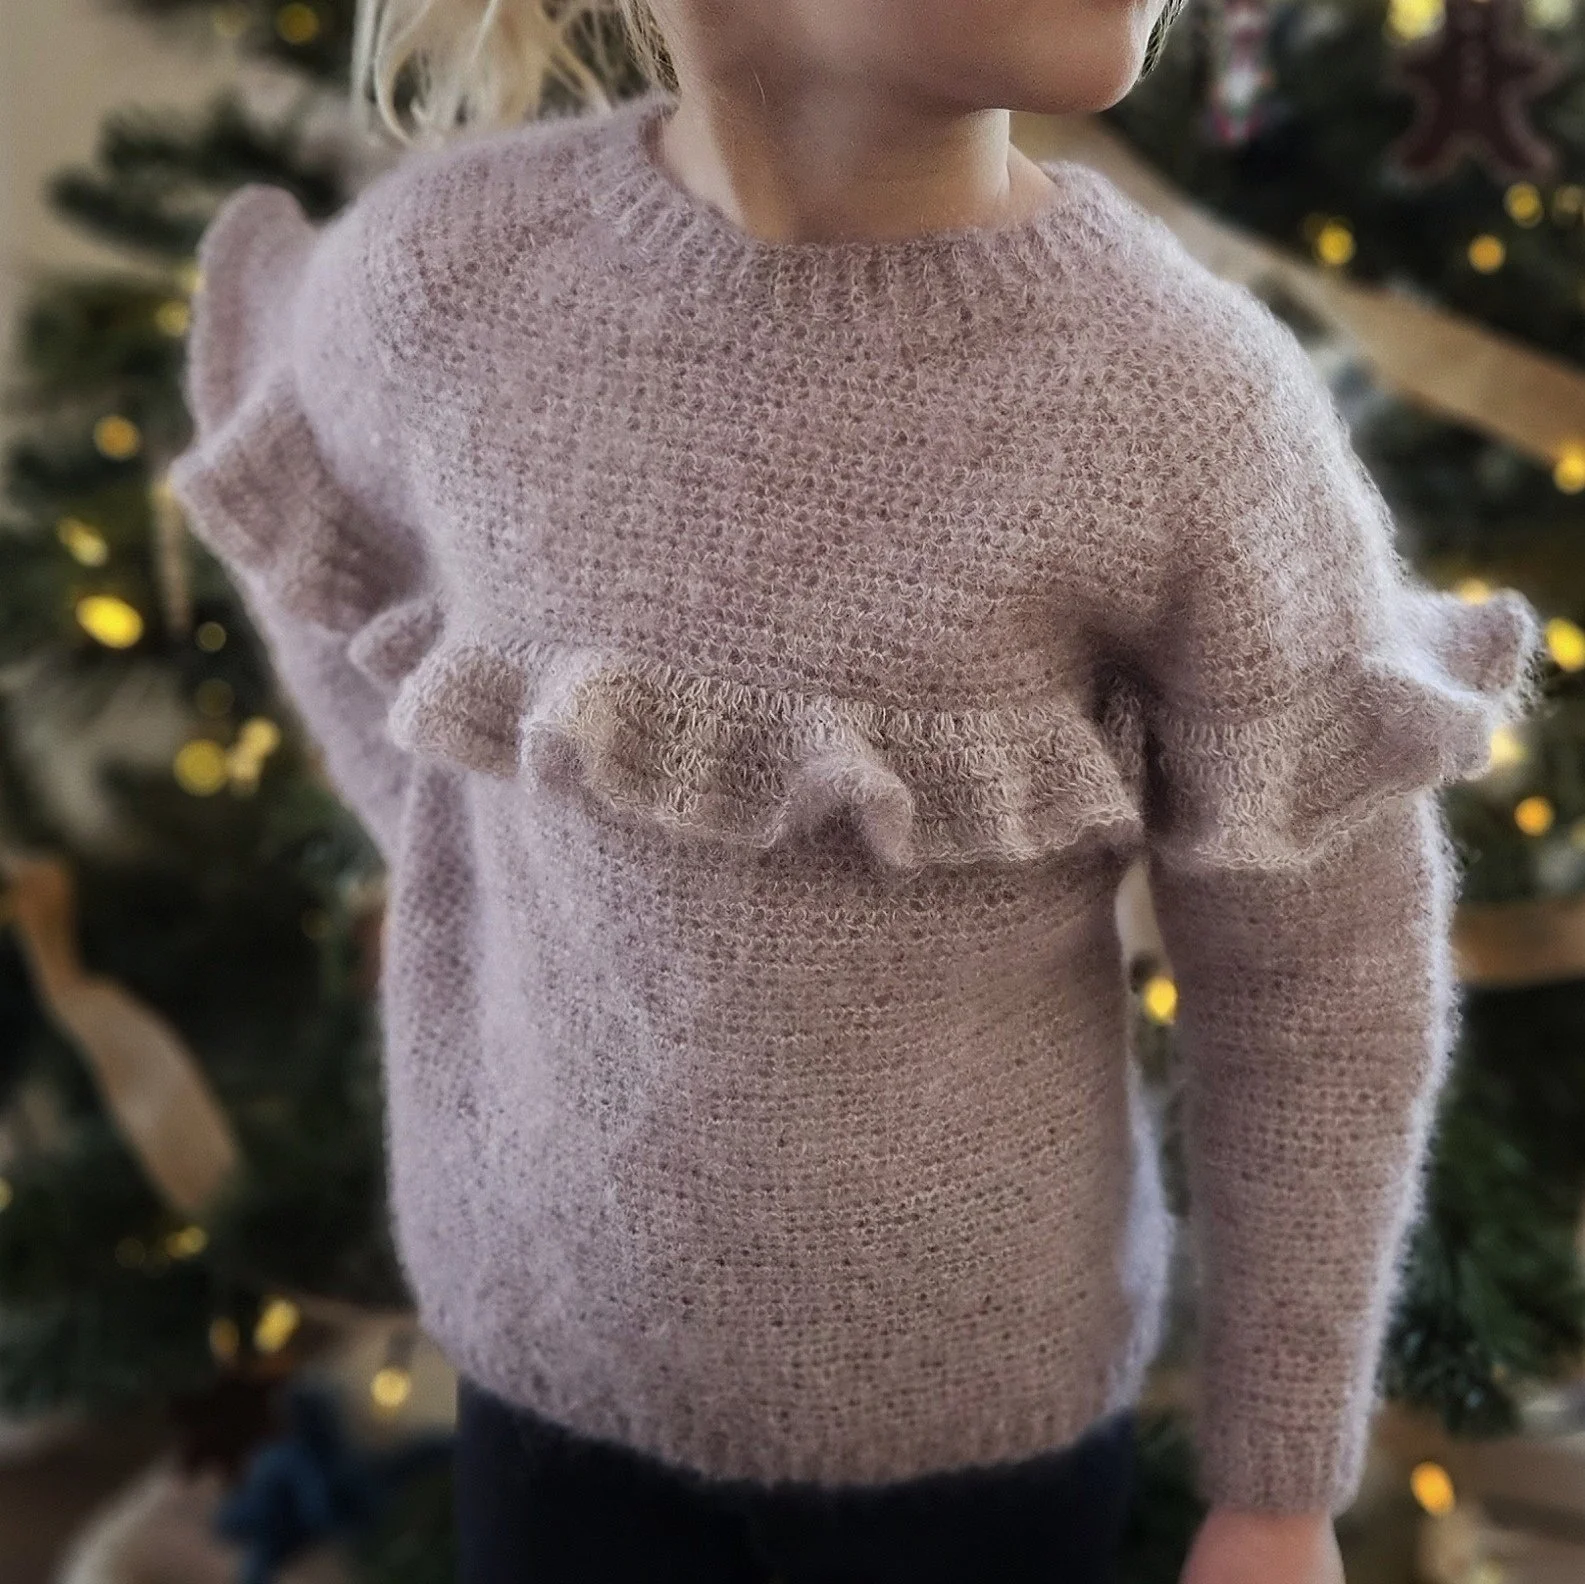
This kids’ raglan sweater features sweet ruffles around the yoke that make it feel extra special, like something straight out of a storybook. It’s perfect for picture days, family photos, or just keeping your little one warm and stylish on a chilly afternoon.

With video tutorials for any difficult parts, the pattern is beginner-friendly and works up beautifully in your favorite soft yarn. I can’t wait for you to see how lovely it looks once it’s finished, you’re going to fall in love with those ruffles just like I did!

Remeber to PIN this tutorial for later:

Just a heads-up: This blog post may contain affiliate links. Don't worry, though - these links are a win-win! They help support my site without costing you a penny extra. So, if you find something you love, clicking through won't just benefit me and my family, it'll also help you discover great products and resources.

Purchase the ad-free pattern

Enjoy a seamless crochet experience with the ad-free, printable PDF of the Camellia Sweater!

This premium version provides a clear, easy-to-read format with an exclusive picture tutorial and color-coded sizes, making it perfect for printing and crafting without distractions.

Stitch and Hound Pattern Store
Etsy
Ravelry

Difficulty

This pattern is rated Intermediate. A simple stitch pattern and some shaping are used to create this sweater

Finished Measurements

camellia sweater size chart for crochet raglan sweater

This sweater is designed to have a classic fit with approximately 5 cm (2") of ease. To select the correct size, measure around the widest part of the chest and add 5 cm (2").

Model pictured is wearing a size 4T and has a bust measurement of 58 cm (23 inches).

Centimeters given as 2T (4T) 6T (8) 10

Bust: 56 (61.5) 66.5 (70) 74

Sweater Length: 34.5 (37) 39.5 (44.5) 48.5

Sleeve Length: 21.5 (26.5) 29 (31.5) 34.5

Inches given as 2T (4T) 6T (8) 10

Bust: 22, 24, 26, 27.5, 29

Sweater Length: 13.5, 14.5, 15.5, 17.5, 19

Sleeve Length: 8.5, 10.5, 11.5, 12.5, 13.5

Yarn

You will need the following amounts of a lace weight (0) or fingering weight (1) yarn given as 2T (4T) 6T (8) 10

  • meters: 680 (800) 910 (1100) 1300

  • yards: 750 (880) 1000 (1250) 1450

Sample was made using Hobbii Friends Kid Silk yarn in the color “dusty mauve (58).” Kid Silk is a 72% mohair, 25% silk, 3% wool blend, lace weight (0) yarn that contains 200 meters (218 yards) per 25 grams (0.9 oz).

For my sample, I used Hobbii Kid Silk, a luxurious blend of mohair and silk that gives the sweater that dreamy, delicate halo. Mohair yarns can be a little tricky to work with, though! For an easier alternative, try any lace weight (0) or fingering weight (1) yarn that meets gauge. To keep that same fuzzy look, consider holding your chosen yarn double with a mohair yarn.

Here are a few great yarn alternatives you can try:

Knit Picks Aloft

  • a soft and airy mohair blend that adds beautiful texture without being scratchy

  • $14.99 per 25g ball

Drops Kid-Silk

  • a silky, affordable mohair option that gives a gentle halo and gorgeous drape

  • $8 - $9 per 25g ball

Yarn Citizen Trinity Cashmere Yarn

  • an ultra-soft, luxury blend of wool, cashmere, and nylon that feels amazing against the skin. It’s a perfect non-mohair choice for a smooth, cozy version of the Camellia Sweater.

  • Around $17 per 25g ball

Hook Size and Notions

Pattern Abbreviations

ch(s) – chain(s)

dc - double crochet

PM - place marker

prev - previous

rep – repeat

rnd(s) - round(s)

sc – single crochet

sc2tog – single crochet two together

sk - skip

sl st – slip stitch

SM - stitch marker

sp - space

st(s) – stitch(es)

tch(s) – turning chain(s)

yo – yarn over

( ) - work a group of stitches all in the same stitch or space

** – repeat instructions between asterisks as many times as directed

(These are US crochet terms from the Craft Yarn Council)

Gauge

20 stitches and 25 rows in a 10 cm (4") square using a 3.5 mm hook

Chain enough stitches for the finished gauge swatch to measure a little over 10 cm (4")

Row 1 sc in second ch from hook and in each remaining ch, ch 1, turn

Row 2 sc in each st across, ch 1, turn

rep row 2 until gauge swatch measures a little over 10 cm (4") in height. Measure gauge in center of swatch.

Click HERE to learn more about gauge.

Notes

  • This sweater is worked top down in a raglan style. The yoke is first worked in rounds, then ruffles are added to the yoke. The sleeves and body are then worked in rounds individually.

  • Pattern is written as follows for each size: 2T (4T) 6T (8) 10

  • To make counting stitches easier for the yoke, stitch counts are given as the number of stitches between each stitch marker (the 4 stitches containing stitch markers are not included in the stitch count). The number of stitches between the stitch markers will be the same for each sleeve and the same for the front and the back portion of the sweater, so 2 stitch counts are given for each row as follows: (2T front and back, 2T sleeves; 4T front and back, 4T sleeves; 6T front and back, 6T sleeves; 8 front and back, 8 sleeves; 10 front and back, 10 sleeves)

    • For example: (24, 14; 26, 14; 28, 14; 30, 14; 30, 14 sts) means that for a 2T size there are 24 stitches in the front and back portions and 14 stitches in each sleeve; for a 4T size there are 26 stitches in the front and back portions and 14 stitches in each sleeve, etc.

  • For the body and sleeves of the sweater, stitch counts are given as follows: (2T, 4T, 6T, 8, 10 sts).

Pattern

Yoke

Work the yoke portion of the pattern until you run out of your first skein of yarn and then follow the instructions for “Ruffles.” If you complete the yoke section of the pattern before running out of yarn, work the “Ruffles” section before continuing on to the “Body” section.

Using a 3.5 mm hook, ch 80 (84) 88 (92) 92

Rnd 1 sc in first ch to form a loop, sc in each ch around, sl st to first sc, ch 1, turn (80, 84, 88, 92, 92 sts)

Short Row 1 sc, PM, sc, (sc 2 times, PM, sc) in same st, sc in next 14 sts, (sc 2 times, PM, sc) in next st, sc in next 24 (26) 28 (30) 30 sts, (sc 2 times, PM, sc) in next st , sc in next 14 sts, (sc 2 times, PM, sc) in next st , sc in next 3 sts, sl st, ch 1, turn (26, 16; 28, 16; 30, 16; 32, 16; 32, 16 sts)

Short Row 2 sk sl st, sc in first sc st, PM in ch 1 sp, *sc to SM, sc in st containing SM, PM* rep 3 more times, sc to SM indicating the first sc of the prev row, sc in st containing SM, sc in next st (from Rnd 1), sl st in next st, ch 1, turn (26, 16; 28, 16; 30, 16; 32, 16; 32, 16 sts)

Short Row 3 sk sl st, sc in first sc st, PM in ch 1 sp, *sc to SM (sc 2 times, PM, sc) in st containing SM* rep 3 more times, sc to SM indicating ch 1 sp, sc in ch 1 sp, sc in next st (from Row 1), sl st in next st, ch 1, turn (28, 18; 30, 18; 32, 18; 34, 18; 34, 18 sts)

Short Row 4 sk sl st, sc in first sc st, PM in ch 1 sp, *sc to SM, sc in st containing SM, PM* rep 3 more times, sc to SM indicating ch 1 sp, sc in ch 1 sp, sc in next st (from Row 1), sl st in next st, ch 1, turn (28, 18; 30, 18; 32, 18; 34, 18; 34, 18 sts)

Short Row 5 sk sl st, sc in first sc st, PM in ch 1 sp, *sc to SM (sc 2 times, PM, sc) in st containing SM* rep 3 more times, sc to SM indicating ch 1 sp, sc in ch 1 sp, sc in next st (from Row 1), sl st in next st, ch 1, turn (30, 20; 32, 20; 34, 20; 36, 20; 36, 20 sts)

Short Row 6 sk sl st, sc in first sc st, PM in ch 1 sp, *sc to SM, sc in st containing SM, PM* rep 3 more times, sc to SM indicating ch 1 sp, sc in ch 1 sp, sc in next st (from Row 1), sl st in next st (30, 20; 32, 20; 34, 20; 36, 20; 36, 20 sts)

Fasten off. Using a 3.5 mm hook, join a new yarn at the back of the sweater as close to the center as possible.

Rnd 2 *sc to SM (sc 2 times, PM, sc) in st containing SM* rep 1 more time, sc to SM indicating ch 1 sp, sc in ch 1 sp, *sc to SM, (sc 2 times, PM, sc) in st containing SM* rep 1 more time, sc to first st of rnd, sl st to first st of rnd, ch 1, turn (32, 22; 34, 22; 36, 22; 38, 22; 38, 22 sts)

Rnd 3 *sc to SM, sc in st containing SM, PM* rep 3 more times, sc to first st of rnd, sl st to first st of rnd, ch 1, turn (32, 22; 34, 22; 36, 22; 38, 22; 38, 22 sts)

Rnd 4 *sc to SM, (sc 2 times, PM, sc) in st containing SM* rep 3 more times, sc to first st of rnd, sl st to first st of rnd, ch 1, turn (34, 24; 36, 24; 38, 24; 40, 24; 40, 24 sts)

Rnds 5 - 27 (29) 31 (35) 39 rep rnds 3 - 4 (st count increases by 2 after each even numbered rnd for both the front and back and sleeve portions, you will end with 56, 46; 60, 48; 64, 50; 70, 54; 74, 58 sts)

Do not fasten off, finish “Ruffles” first (if you haven’t already), then continue with “Body.” The ruffles will be more difficult to work after the body of the sweater has been completed.

Ruffles

To create the ruffles. you will work a round of surface slip stitches. The ruffles are then created from double crochet stitches worked on top of the round of surface slip stitches.

Insert a 3.5 mm crochet hook in between any two single crochet stitches of round 23 (25) 27 (31) 35 from front to back. Holding a new strand of yarn at the back of the sweater, pull up a loop to the front of the sweater.

  • Insert hook from front to back in the next space that is the gap between 2 single crochet stitches.

  • Yo, pull up a loop.

Repeat step 1 - 2 around. When you reach the first slip stitch worked, fasten off (192, 204, 216, 236, 252 sts)

Using a 3.5 mm crochet hook, join a new yarn in any surface slip stitch.

Rnd 1 ch 3, *dc 2 times in same st, dc* rep around, dc 2 times in last st, sl st into first ch-3 (288, 306, 324, 354, 378 sts)

Rnd 2 ch 3, dc in next st, *dc 2 times in next st, dc in next 2 sts* rep around, dc 2 times in last st, sl st into first ch-3 (384, 408, 432, 472, 504 sts)

Rnd 3 ch 3, dc in next 2 sts *dc 2 times in next st, dc in next 3 sts* rep around, dc 2 times in last st, sl st into first ch-3 (480, 510, 540, 590, 630 sts)

Rnd 4 ch 3, dc in next 3 sts, *dc 2 times in next st, dc in next 4 sts* rep around, dc 2 times in last st, sl st into tchs (576, 612, 648, 708, 756 sts)

Fasten off.

Body

Rnd 1 ch 1, turn, sc to SM, sc in st containing SM, ch 3, sk next 46 (48) 50 (54) 58 sts, sc in st containing next SM, sc to next SM, ch 3, sk next 46 (48) 50 (54) 58 sts, sc in st containing next SM, sc to first st of rnd, sl st in first st of rnd (122, 130, 138, 150, 158 sts)

Rnd 2 ch 1, turn, sc to ch 3 sp, sc in each ch, sc to next ch 3 sp, sc in each ch, sc to first st of rnd, sl st to first st of rnd (122, 130, 138, 150, 158 sts)

Rnds 3 - 54 (58) 62 (71) 77 ch 1, turn, sc around, sl st to first st of rnd (122, 130, 138, 150, 158 sts)

Using a 3.0 mm hook, ch 7 and follow instructions for “crochet ribbing”

Sleeves

Using a 3.5 mm hook, join a new yarn in any stitch at the sleeve opening.

Rnd 1 ch 1, sc in each st around, sl st in first st of rnd (52, 54, 56, 60, 64 sts)

Rnd 2 ch 1, turn, sc in each st around, sc2tog once during rnd, sl st in first st of rnd (51, 53, 55, 59, 63 sts)

Rnd 3 ch 1, turn, sc in each st around, sl st in first st of rnd (51, 53, 55, 59, 63 sts)

Rnds 4 - 48 rep rnds 2 - 3 (st count decreases by 1 after each even numbered rnd, you will end with 28, 30, 32, 36, 40 sts)

Continue following pattern in your size.

Size 2T

Using a 3.0 mm hook, ch 7 and follow instructions for “crochet ribbing”

Size 4T

Rnds 49 - 52 rep rnd 3 (30 sts)

Using a 3.0 mm hook, ch 7 and follow instructions for “crochet ribbing”

Size 6T

Rnds 49 - 58 rep rnd 3 (32 sts)

Using a 3.0 mm hook, ch 7 and follow instructions for “crochet ribbing”

Size 8

Rnds 49 - 64 rep rnd 3 (36 sts)

Using a 3.0 mm hook, ch 7 and follow instructions for “crochet ribbing”

Size 10

Rnds 49 -57 rep rnds 3 - 4 (st count decreases by 1 after each even numbered rnd, you will end with 36 sts)

Rnds 58 - 70 rep rnd 3 (36 sts)

Using a 3.0 mm hook, ch 7 and follow instructions for “crochet ribbing”

Collar

Using a 3.0 mm hook, join yarn in any stitch along the collar, in the back of the sweater. Ch 7 and follow instructions for “Crochet Ribbing.”

Crochet Ribbing

1. Chain specified number of stitches.

2. Single crochet in the second chain from hook, and in each remaining chain.

3. Slip stitch into the next 2 stitches along the sleeve cuffs, collar, or bottom of sweater.

4. Turn your work so you are working back up the single crochet stitches that were just made. Skip the two slip stitches, then single crochet in the back loops only of each single crochet stitch. Single crochet through both loops of the final single crochet stitch, chain 1, and turn.

5. Working back down the single crochet stitches that were just made, single crochet through both loops of the first stitch, then single crochet in the back loops only of the remaining stitches.

6. repeat steps 3 - 5 until each stitch along the sleeve cuffs, collar, or bottom of the sweater has been slip stitched into.

NOTE: When there is an even number of stitches, you will end up with 1 extra stitch to slip stitch into instead of 2. Slip stitch into this final stitch, turn your work to work back up the previous row of single crochet stitches, skip the 1 slip stitch, back loop only single crochet in each stitch, single crochet through both loops of the final stitch.

Fasten off.

Whip stitch the first and the last row together to close, then weave in ends.

Share Your Work!

You’ve put in a lot of effort to create your Camellia Sweater, and you should be proud of your achievement! Share your pictures using #stitchandhoundcrochet to connect with the community and receive support and feedback. Don’t forget to check out the social links below!

Pattern Support

If you have any questions or need a little extra help with your Camellia Sweater, don’t hesitate to reach out! Join the Stitch and Hound Facebook group! for pattern support, tips, and a wonderful community of fellow crocheters. It’s the perfect place to ask questions, share your progress, and connect with others who are crafting along with you. I’m there to offer help and support every step of the way!

Next
Next

Snuggled in Bobbles Sweater