Front and Back Panels
All Sizes
Using a 4.25 mm crochet hook and Color 1, ch 54 (58) 62 (66) 70
Row 1 sc in second ch from hook, sc in each ch across {53, 57, 61, 65, 69 sts}
Row 2 ch 3, turn, dc in same st (the first st that is typically skipped when ch-3 counts as a stitch), *ch 1, sk 3 sts, dc 3 times in next st* rep across, ch 1, sk 3 sts, dc 2 times in last st {12, 13. 14. 15, 16 clusters}
Row 3 With color 2, ch 3, turn, *(dc, dc into center st of the 3 skipped sts from previous row, dc) in next ch-1 sp, ch 1* rep across, dc in top of ch-3 {13, 14, 15, 16, 17 clusters}
Row 4 With color 1, ch 3, turn, (dc in skipped dc from prev row) in first ch-1 sp, ch 1, *(dc, dc into center st of cluster from previous row, dc) in next ch-1 sp, ch 1* rep across, dc 2 times in ch-3 sp {12, 13, 14, 15, 16 clusters}
Row 5 with color 2, ch 3, turn, *(dc, dc into center st of cluster from previous row, dc) in next ch-1 sp, ch 1* rep across, dc in top of ch-3 {13, 14, 15, 16, 17 clusters}
Continue following pattern in your size
Size 2T
Rows 6 - 9 rep rows 4 - 5
Rows 10 - 15 rep rows 4 - 5 using ONLY color 2
Rows 16 - 23 rep rows 4 - 5
Rows 24 - 29 rep rows 4 - 5 using ONLY color 2
Row 30 rep row 4 (color 1)
Do not fasten off. Continue with the “Front Panel Collar” instructions. When complete, work Rows 1 - 30 and then follow the “Back Panel Collar” instructions for the back panel.
Size 4T
Rows 6 - 9 rep rows 4 - 5
Rows 10 - 15 rep rows 4 - 5 using ONLY color 2
Rows 16 - 23 rep rows 4 - 5
Rows 24 - 29 rep rows 4 - 5 using ONLY color 2
Rows 30 - 32 rep rows 4 - 5, ending on row 4 (color 1)
Do not fasten off. Continue with the “Front Panel Collar” instructions. When complete, work Rows 1 - 32 and then follow the “Back Panel Collar” instructions for the back panel.
Size 6T
Rows 6 - 9 rep rows 4 - 5
Rows 10 - 15 rep rows 4 - 5 using ONLY color 2
Rows 16 - 23 rep rows 4 - 5
Rows 24 - 29 rep rows 4 - 5 using ONLY color 2
Rows 30 - 34 rep rows 4 - 5, ending on row 4 (color 1)
(BACK PANEL ONLY) Rows 35 - 36 rep row 5, then repeat row 4
Do not fasten off. Continue with the “Front Panel Collar” instructions. When complete, work Rows 1 - 36 and then follow the “Back Panel Collar” instructions for the back panel.
Size 8
Rows 6 - 11 rep rows 4 - 5
Rows 12 - 19 rep rows 4 - 5 using ONLY color 2
Rows 20 - 29 rep rows 4 - 5
Rows 30 - 37 rep rows 4 - 5 using ONLY color 2
Rows 38 - 40 rep rows 4 - 5, ending on row 4 (color 1)
(BACK PANEL ONLY) Rows 41 - 42 rep row 5, then repeat row 4
Do not fasten off. Continue with the “Front Panel Collar” instructions. When complete, work Rows 1 - 42 and then follow the “Back Panel Collar” instructions for the back panel.
Size 10
Rows 6 - 11 rep rows 4 - 5
Rows 12 - 19 rep rows 4 - 5 using ONLY color 2
Rows 20 - 29 rep rows 4 - 5
Rows 30 - 37 rep rows 4 - 5 using ONLY color 2
Rows 38 - 44 rep rows 4 - 5, ending on row 4 (color 1)
(BACK PANEL ONLY) Rows 45 - 46 rep row 5, then repeat row 4
Do not fasten off. Continue with the “Front Panel Collar” instructions. When complete, work Rows 1 - 46 and then follow the “Back Panel Collar” instructions for the back panel.
Front Panel Collar
(Right side)
All Sizes
Place a stitch marker in the 5th (5th) 6th (6th) 6th ch-1 space from the left edge and in the 5th (5th) 6th (6th) 6th ch-1 space from the right edge.
Row 31 (33) 35 (41) 45 With color 2, ch 3, turn, (dc, dc into center st of cluster from previous row, dc) in next ch-1 sp, *ch 1, (dc, dc into center st of cluster from previous row, dc) in next ch-1 sp*, rep across working last cluster into the ch-1 sp containing the SM, fasten off {5, 5, 6, 6, 6 clusters}
Row 32 (34) 36 (42) 46 turn, join color 1 in first ch-1 sp, ch 3, dc into center st of cluster from prev row, dc, ch 1, *(dc, dc into center st of cluster from prev row, dc) in next ch-1 sp, ch 1* rep across, dc 2 times in ch-3 sp {4, 4, 5, 5, 5 clusters}
Row 33 (35) 37 (43) 47 with color 2, ch 3, turn, (dc, dc into center st of cluster from previous row, dc) in next ch-1 sp, *ch 1, (dc, dc into center st of cluster from previous row, dc) in next ch-1 sp* rep across, fasten off {4, 4, 5, 5, 5 clusters}
Continue following pattern for your size.
Sizes 2T and 4T
Row 34 (36) X (X) X with color 1, ch 1, turn, sc in next 3 sts, *in next ch-1 sp dc into center st of cluster from previous row, sc in next 3 sts* rep across, dc 2 times in ch-3 sp {17, 17, X, X, X sts}
Fasten off, continue with (Left Side) to complete the Left side of the collar.
Sizes 6T, 8, and 10
Row X (X) 38 (44) 48 turn, join color 1 in first ch-1 sp, ch 3, dc into center st of cluster from prev row, dc, ch 1, *(dc, dc into center st of cluster from prev row, dc) in next ch-1 sp, ch 1* rep across, dc 2 times in ch-3 sp {X, X, 4, 4, 4 clusters}
Row X (X) 39 (45) 49 with color 2, ch 3, turn, (dc, dc into center st of cluster from previous row, dc) in next ch-1 sp, *ch 1, (dc, dc into center st of cluster from previous row, dc) in next ch-1 sp* rep across, fasten off {X, X, 4, 4, 4 clusters}
Row X (X) 40 (46) 50 with color 1, ch 1, turn, sc in next 3 sts, *in next ch-1 sp dc into center st of cluster from previous row, sc in next 3 sts* rep across, dc 2 times in ch-3 sp {X, X, 17, 17, 17 sts}
Fasten off, continue with (Left Side) to complete the Left side of the collar.
(Left Side)
All Sizes
Position the collar so the completed half is on your right side. Join color 2 in the marked ch-1 space. Work across from the center of the panel toward the outer edge.
Row 31 (33) 35 (41) 45 ch 3, dc into center st of cluster from previous row, dc) all in same ch-1 sp, ch 1, *(dc, dc into center st of cluster from previous row, dc) in next ch-1 sp, ch 1* rep across, dc in top of ch-3 {5, 5, 6, 6, 6 clusters}
Row 32 (34) 36 (42) 46 with color 1, ch 3, turn, in first ch-1 sp dc in skipped dc from prev row, *ch 1, (dc, dc into center st of cluster from previous row, dc) in next ch-1 sp* rep across, fasten off {4, 4, 5, 5, 5 clusters}
Row 33 (35) 37 (43) 47 turn, join color 2 in first ch-1 sp, ch 3, dc into center st of cluster from prev row, dc, ch 1, *(dc, dc into center st of cluster from previous row, dc) in next ch-1 sp, ch 1* rep across, dc in top of ch-3 {4, 4, 5, 5, 5 clusters}
Continue following pattern for your size.
Sizes 2T and 4T
Row 34 (36) X (X) X with color 1, ch 1, turn, sc in first st, in next ch-1 sp dc in skipped dc from prev row, sc in next 3 sts, *in next ch-1 sp dc into center st of cluster from previous row, sc in next 3 sts* rep across working last sc in top of ch-3 {17, 17, X, X, X sts}
Fasten off.
Sizes 6T, 8, and 10
Row X (X) 38 (44) 48 with color 1, ch 3, turn, in first ch-1 sp dc in skipped dc from prev row, *ch 1, (dc, dc into center st of cluster from previous row, dc) in next ch-1 sp* rep across, fasten off {X, X, 4, 4, 4 clusters}
Row X (X) 39 (45) 49 turn, join color 2 in first ch-1 sp, ch 3, dc into center st of cluster from prev row, dc, ch 1, *(dc, dc into center st of cluster from previous row, dc) in next ch-1 sp, ch 1* rep across, dc in top of ch-3 {X, X, 4, 4, 4 clusters}
Row X (X) 40 (46) 50 with color 1, ch 1, turn, sc in first st, in next ch-1 sp dc in skipped dc from prev row, sc in next 3 sts, *in next ch-1 sp dc into center st of cluster from previous row, sc in next 3 sts* rep across working last sc in top of ch-3 {X, X, 17, 17, 17 sts}
Fasten off.
Back Panel Collar
(Right side)
All Sizes
Place a stitch marker in the 5th (5th) 5th (5th) 5th ch-1 space from the left edge and in the 5th (5th) 5th (5th) 5th ch-1 space from the right edge.
Row 31 (33) 37 (43) 47 With color 2, ch 3, turn, (dc, dc into center st of cluster from previous row, dc) in first ch-1 sp, *ch-1, (dc, dc into center st of cluster from previous row, dc) in next ch-1 sp*, rep across working last cluster into the ch-1 sp containing the SM, fasten off {5, 5, 5, 5, 5 clusters}
Row 32 (34) 38 (44) 48 turn, join color 1 in first ch-1 sp, (ch 3, dc into center st of cluster from prev row, dc) in first ch-1 sp, ch 1, *(dc, dc into center st of cluster from previous row, dc) in next ch-1 sp, ch 1* rep across, dc 2 times in ch-3 sp {4, 4, 4, 4, 4 clusters}
Row 33 (35) 39 (45) 49 with color 2, ch 3, turn, (dc, dc into center st of cluster from previous row, dc) in first ch-1 sp, *ch-1, (dc, dc into center st of cluster from previous row, dc) in next ch-1 sp*, rep across {4, 4, 4, 4, 4 clusters}
Row 34 (36) 40 (46) 50 with color 1, ch 1, turn, sc in next 3 sts, *in next ch-1 sp dc into center st of cluster from previous row, sc in next 3 sts* rep across, dc 2 times in ch-3 sp {17, 17, 17, 17, 17 sts}
Fasten off
(Left Side)
Position the collar so the completed half is on your right side. Join color 2 in the marked ch-1 space. Work across from the center of the panel toward the outer edge.
Row 31 (33) 37 (43) 47 (ch 3, dc into center st of cluster from previous row, dc) all in same ch-1 sp, ch 1, *(dc, dc into center st of cluster from previous row, dc) in next ch-1 sp, ch 1* rep across, dc in top of ch-3 {5, 5, 5, 5, 5 clusters}
Row 32 (34) 38 (44) 48 with color 1, ch 3, turn, in first ch-1 sp dc in skipped dc from prev row, *ch 1, (dc, dc into center st of cluster from previous row, dc) in next ch-1 sp* rep across, fasten off {4, 4, 4, 4, 4 clusters}
Row 33 (35) 39 (45) 49 turn, join color 2 in first ch-1 sp, (ch 3, dc into center st of cluster from previous row, dc) all in same ch-1 sp, ch 1, *(dc, dc into center st of cluster from previous row, dc) in next ch-1 sp, ch 1* rep across, dc in top of ch-3 {4, 4, 4, 4, 4 clusters}
Row 34 (36) 40 (46) 50 with color 1, ch 1, turn, sc in first st, in next ch-1 sp dc in skipped dc from prev row, sc in next 3 sts, *in next ch-1 sp dc into center st of cluster from previous row, sc in next 3 sts* rep across working last sc in top of ch-3 {17, 17, 17, 17, 17 sts}
Seaming
Lay the sweater panels together, making sure each stitch at the top lines up directly with its matching stitch on the opposite panel.
With color 1, use a whip stitch to seam across the shoulders, working 17 sts.
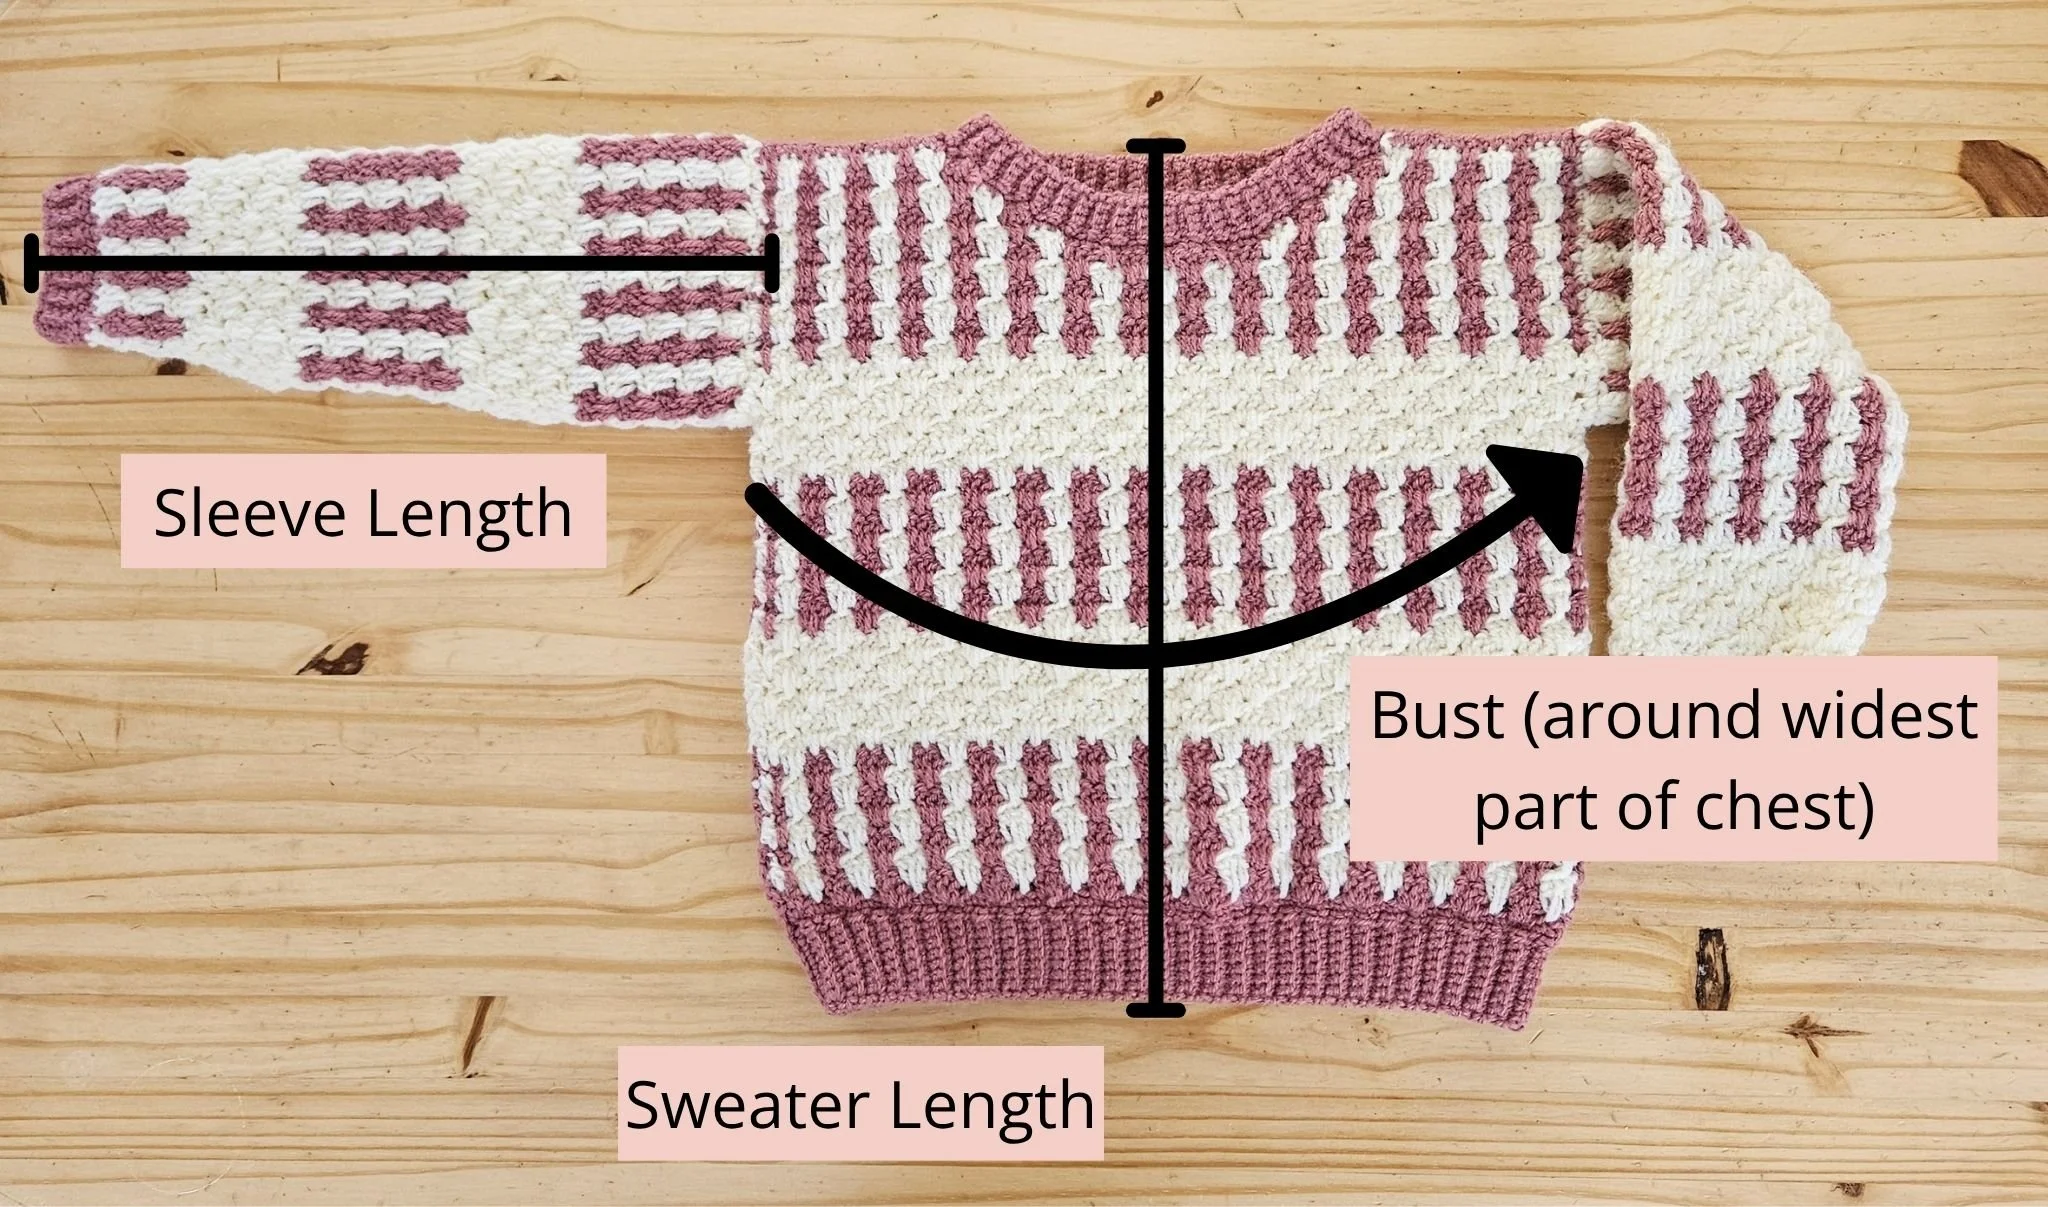
With color 2, use a mattress stitch, seam from the bottom of the sweater up 23 (24) 27 (32) 34 rows. Leave approximately 11 (12) 13 (14) 16 cm / 4" (4.5") 5" (5.5") 6", unseamed for the armhole depth.
Sleeves
All Sizes
With a 4.25 mm crochet hook and color 2, join yarn in any stitch near the underarm on the outside of the sweater.
Rnd 1 ch 1, pick up 40 (44) 48 (52) 56 sts evenly spaced around the armhole, sl st to first sc to join {40, 44, 48, 52, 56 sts}
Rnd 2 ch 3, dc 2 times in same st, *ch 1, sk 3 sts, dc 3 times in next st* rep acround, ch 1, sk last 3 sts, sl st in top of beg ch-3 to join {10, 11, 12, 13, 14 clusters}
Rnd 3 With color 1, ch 3, turn, (dc into center st of the 3 skipped sts from prev rnd, dc) in first ch-1 sp, ch 1, *(dc, dc into center st of the 3 skipped sts from previous rnd, dc) in next ch-1 sp, ch 1* rep around, sl st in top of beg ch-3 to join {10, 11, 12, 13, 14 clusters}
Rnd 4 with color 2, ch 3, turn, (dc into center st of cluster from prev rnd, dc) in first ch-1 sp, ch 1, *(dc, dc into center st of cluster from previous rnd, dc) in next ch-1 sp, ch 1* rep around, sl st in top of beg ch-3 to join {10, 11, 12, 13, 14 clusters}
Rnd 5 with color 1, ch 3, turn, (dc into center st of cluster from prev rnd, dc) in first ch-1 sp, ch 1, *(dc, dc into center st of cluster from previous rnd, dc) in next ch-1 sp, ch 1* rep around, sl st in top of beg ch-3 to join {10, 11, 12, 13, 14 clusters}
Continue following pattern for your size
Size 2T
Rnds 6 - 7 rep rnds 4 - 5 {10 clusters}
Rnds 8 - 12 rep rnd 4 and decrease once anywhere in rnd on rnd 11 (see “special stitches and techniques” for decrease instructions) {you will end rnd 12 with 9 clusters}
Rnds 13 - 17 rep rnd 5, then rep rnds 4 - 5 {9 clusters}
Rnds 18 - 22 rep rnd 4 and decrease once anywhere in rnd on rnds 19 and 21 {you will end rnd 22 with 7 clusters}
Rnd 23 with color 1, ch 1, sc in next 3 sts, *dc into center st of cluster from prev rnd, sc in next 3 sts* rep around, dc into center st of cluster from prev rnd in final ch-1 sp, sl st to first st of rnd {28 sts}
Using a 3.75 mm crochet hook, Ch 5 and follow instructions for “Crochet Ribbing.”
Size 4T
Rnds 6 - 7 rep rnds 4 - 5 {11 clusters}
Rnds 8 - 12 rep rnd 4 and decrease once anywhere in rnd on rnd 11 (see “special stitches and techniques” for decrease instructions) {you will end rnd 12 with 10 clusters}
Rnds 13 - 17 rep rnd 5, then rep rows 4 - 5 {10 clusters}
Rnds 18 - 22 rep rnd 4 and decrease once anywhere in rnd on rnds 19 and 21 {you will end rnd 22 with 8 clusters}
Rnds 23 - 26 rep rnd 5, then rep rnds 4 - 5, ending on rnd 4 {8 clusters}
Rnd 27 with color 1, ch 1, sc in next 3 sts, *dc into center st of cluster from prev rnd, sc in next 3 sts* rep around, dc into center st of cluster from prev rnd in final ch-1 sp, sl st to first st of rnd {32 sts}
Using a 3.75 mm crochet hook, Ch 5 and follow instructions for “Crochet Ribbing.”
Sizes 6T
Rnds 6 - 9 rep rnds 4 - 5 {12 clusters}
Rnds 10 - 16 rep rnd 4 and decrease once anywhere in the rnd on rnds 13 and 15 (see “special stitches and techniques” for decrease instructions) {you will end rnd 16 with 10 clusters}
Rnds 17 - 23 rep rnd 5, then rep rnds 4 - 5 {10 clusters}
Rnds 24 - 30 rep rnd 4 and decrease once anywhere in the rnd on rnds 27 and 29 {you will end rnd 30 with 8 clusters}
Rnds 31 - 32 rep rnds 5, then 4
Rnd 33 with color 1, ch 1, sc in next 3 sts, *dc into center st of cluster from prev rnd, sc in next 3 sts* rep around, dc into center st of cluster from prev rnd in final ch-1 sp, sl st to first st of rnd {32 sts}
Using a 3.75 mm crochet hook, Ch 5 and follow instructions for “Crochet Ribbing.”
Size 8
Rnds 6 - 9 rep rnds 4 - 5 {13 clusters}
Rnds 10 - 16 rep rnd 4 and decrease once anywhere in the rnd on rnds 13 and 15 (see “special stitches and techniques” for decrease instructions) {you will end rnd 16 with 11 clusters}
Rnds 17 - 23 rep rnd 5, then rep rnds 4 - 5 {11 clusters}
Rnds 24 - 30 rep rnd 4 and decrease once anywhere in the rnd on rnds 25, 27, and 29 {you will end rnd 30 with 8 clusters}
Rnd 31 - 34 rep rnd 5, then rep rnds 4 - 5, ending on rnd 4 {8 clusters}
Rnd 35 with color 1, ch 1, sc in next 3 sts, *dc into center st of cluster from prev rnd, sc in next 3 sts* rep around, dc into center st of cluster from prev rnd in final ch-1 sp, sl st to first st of rnd {32 sts}
Using a 3.75 mm crochet hook, Ch 7 and follow instructions for “Crochet Ribbing.”
Size 10
Rnds 6 - 9 rep rnds 4 - 5 {14 clusters}
Rnds 10 - 16 rep rnd 4 and decrease once anywhere in the rnd on rnds 13 and 15 (see “special stitches and techniques” for decrease instructions) {you will end rnd 16 with 12 clusters}
Rnds 17- 23 rep rnd 5, then rep rnds 4 - 5 {12 clusters}
Rnds 24 - 30 rep rnd 4 and decrease once anywhere in the rnd on rnds 25, 27, and 29 {you will end rnd 30 with 9 clusters}
Rnd 31 - 38 rep rnd 5, then rep rnds 4 - 5, ending on rnd 4 {9 clusters}
Rnd 39 with color 1, ch 1, sc in next 3 sts, *dc into center st of cluster from prev rnd, sc in next 3 sts* rep around, dc into center st of cluster from prev rnd in final ch-1 sp, sl st to first st of rnd {36 sts}
Using a 3.75 mm crochet hook, Ch 7 and follow instructions for “Crochet Ribbing.”
Bottom of Sweater
Using a 3.75 mm crochet hook, join color 1 in any stitch along the bottom of the sweater. Ch 9 and follow instructions for “Crochet Ribbing.”
Collar
Using a 4.25 mm crochet hook, join color 1 in the first stitch at the back of the collar, just beneath the collar shaping, in the first dc of a cluster (in Row 34 (36) 38 (44) 48)
Rnd 1 ch 1, *sc in next 3 sts, dc into center st of cluster from prev row in next ch-1 sp*, rep across back of collar, sc in last 3 sts before collar shaping
You will now be at the collar shaping “steps” that begin at row 35 (37) 39 (45) 49.
Each “step” is made up of a 3 dc cluster. Work 1 single crochet in the side of each cluster, then work 1 single crochet in each of the first 2 stitches across the top of each cluster.
Work 4 single crochets evenly across the seam where the front and left panels join.
On the opposite side of the collar, work 1 single crochet in each of the last 2 stitches across the top of each cluster (the same 2 stitches as before, now worked in reverse), then work 1 single crochet in the side of each cluster.
The following is worked across Row 34 (36) 38 (44) 48 *sc in next 3 sts, dc into center st of cluster from prev row in next ch-1 sp*, rep across front of collar, sc in last 3 sts before collar shaping
You will now be at the collar shaping “steps” that begin at row 35 (37) 39 (45) 49.
Work 1 single crochet in the side of each cluster, then work 1 single crochet in each of the first 2 stitches across the top of each cluster.
Work 4 single crochets evenly across the seam where the front and left panels join.
On the opposite side of the collar, work 1 single crochet in each of the last 2 stitches across the top of each cluster (the same 2 stitches as before, now worked in reverse), then work 1 single crochet in the side of each cluster.
sl st to first st of rnd.
With a 3.75 mm crochet hook, ch 7 and following instructions for “Crochet Ribbing.”
Crochet Ribbing
1. Chain specified number of stitches.
2. Single crochet in the second chain from hook, and in each remaining chain.
3. Slip stitch into the next 2 stitches along the sleeve cuffs, collar, or bottom of sweater.
4. Turn your work so you are working back up the single crochet stitches that were just made. Skip the two slip stitches, then single crochet in the back loops only of each single crochet stitch. Single crochet through both loops of the final single crochet stitch, chain 1, and turn.
5. Working back down the single crochet stitches that were just made, single crochet through both loops of the first stitch, then single crochet in the back loops only of the remaining stitches.
6. repeat steps 3 - 5 until each stitch along the sleeve cuffs, collar, or bottom of the sweater has been slip stitched into.
NOTE: When there is an even number of stitches, you will end up with 1 extra stitch to slip stitch into instead of 2. Slip stitch into this final stitch, turn your work to work back up the previous row of single crochet stitches, skip the 1 slip stitch, back loop only single crochet in each stitch, single crochet through both loops of the final stitch.
Fasten off.
Whip stitch the first and the last row together to close, then weave in ends.