Crochet Basics: How to Make a Foundation Chain for Beginners
Every great crochet project starts with a solid foundation, and that foundation begins with three basic techniques: the slip knot, chaining, and working into a chain.
Whether you're just picking up a crochet hook for the first time or looking to refresh your skills, mastering these essentials is key to creating beautiful, even stitches and setting the stage for more complex patterns.
In this guide, I’ll walk you through each step, complete with tips to ensure your success.
Before we start, don't forget to save this tutorial for later by pinning it!

Just a heads-up: This blog post may contain affiliate links. Don't worry, though - these links are a win-win! They help support our site without costing you a penny extra. So, if you find something you love, clicking through won't just benefit us, but it'll also help you discover great products and resources!
Video Tutorial
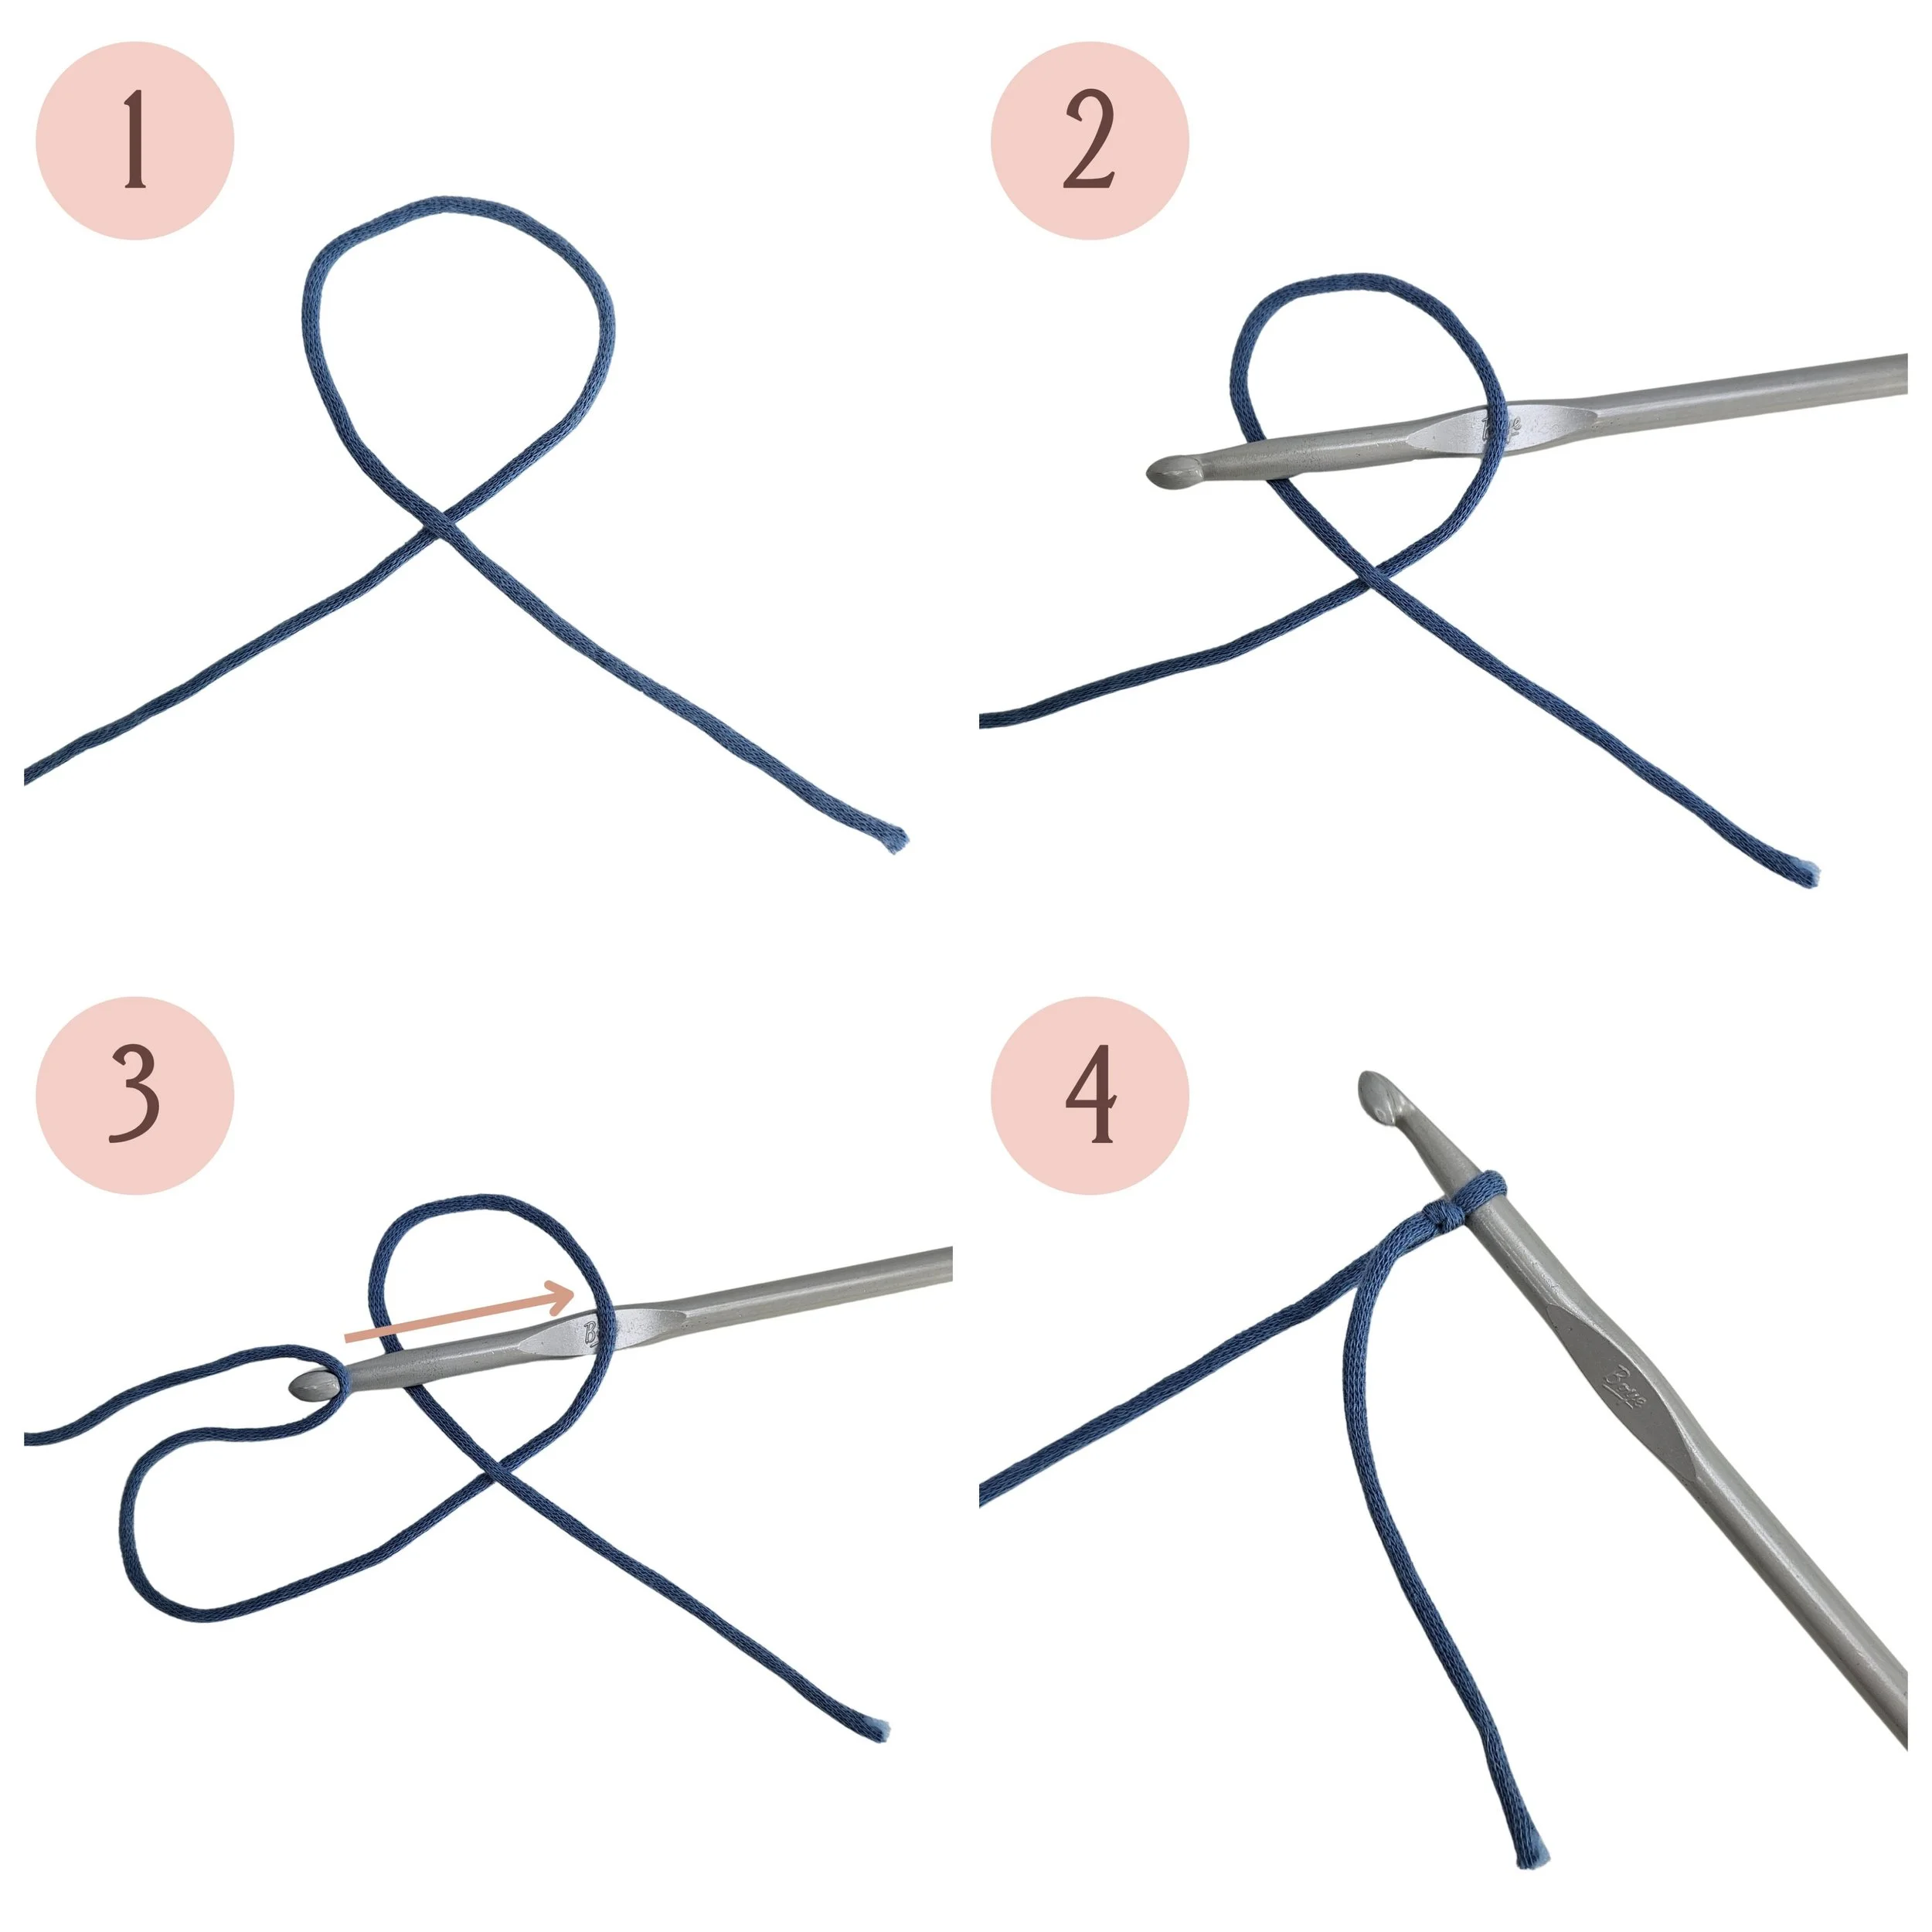
How to Create a Slip Knot
What is a Slip Knot?
A slip knot is the very first loop you’ll place on your crochet hook, and it’s the starting point for most crochet projects. This knot is adjustable, meaning you can easily tighten or loosen it to suit your needs. It’s a simple but crucial step that sets the tone for the rest of your work.
Step-by-Step Guide
Create a loop: Start by making a loop with your yarn, with the tail end crossing over the working yarn (the yarn connected to the ball or skein).
Insert your hook: Slip your crochet into the loop.
Pull up the working yarn: Using your hook, pull the working yarn through the loop. You’ll now have a new loop on your hook.
Tighten the knot: Gently pull to tighten the loop around the hook, and use the working end of the yarn to pull the slip knot snug against the throat of your crochet hook.
Tips
Adjusting the loop: Keep your slip knot slightly loose, so it’s easy to work into it with your first chain stitch.
Consistency: Practice making your slip knot until you can do it smoothly and consistently.
How to Chain
What is a Chain?
The chain is the foundation of a crochet project, the initial chain made in a crochet project is actually called a “foundation chain.” It’s essentially a series of connected loops that create a base row, from which you’ll build your stitches. Maintaining even tension while chaining is important for ensuring your project’s foundation is neither too tight nor too loose.
Step-by-Step Guide
Yarn over (YO): With the slip knot on your hook, wrap the working yarn over the hook from back to front.
Pull through the loop: Use the hook to draw the yarn through the loop already on the hook. You’ve just made your first chain stitch!
Repeat: Continue yarning over and pulling through to create additional chain stitches.

Tips
Too tight or too loose: If your chains are too tight, your work may be difficult to stitch into. If they’re too loose, the foundation row might look uneven. Some crocheters use a hook size smaller or larger than recommended in the pattern for the foundation chain if they tend to crochet chains too loose or too tight.
Even tension: Practice creating even chains by maintaining consistent tension on the yarn as you work.
A note about foundation stitches: there are alternatives to chaining, such as foundation stitches like foundation single and double crochets. These methods combine the chain with the first row of stitches, which can be useful in specific situations. I recommend becoming comfortable with chaining before moving on to these techniques - tutorials to come.
Different Ways to Work into a Chain
After you’ve created your foundation chain, the next step is to start working stitches into it. There are a few different ways to do this, and the method you choose can affect the look and structure of your project.
Working into the Back Bump
The most common and recommended method is working into the back bump of the chain. This "bump" is the horizontal bar on the underside of each chain stitch. Here’s how you do it:
Turn Your Work: Flip your chain over so the back bumps are facing you.
Insert Your Hook: Insert your hook into the back bump of each chain stitch.
Complete Your Stitch: Yarn over and pull through to complete your stitch as usual.

Benefits: Working into the back bump creates a cleaner, more even edge and helps the project maintain its shape.

Working into the Back Bump and Top Loop
Another option is to work into both the back bump and one of the top loops of the chain:
Insert Your Hook: Insert your hook into the front loop of the chain stitch, then slide it under the back bump as well.
Complete Your Stitch: Yarn over and pull through both loops to complete your stitch as usual.

Benefits: This method can create a slightly thicker edge, which can be useful for certain types of projects.

Avoid Working into a Single Loop
Avoid working into only one loop of the chain (typically the top loop), as this can lead to a loose and uneven edge with gaps. Working into a single loop does not provide the same stability or neat finish as working into the back bump or both the back bump and top loop.

Conclusion
Congratulations! By mastering these basic techniques—creating a slip knot, chaining, and working into a chain—you’ve laid a strong foundation for all your future crochet projects. Remember, the key to success in crochet is practice and patience. Don’t be discouraged if your first attempts aren’t perfect. Keep at it, and soon these steps will become second nature.